June is here and it’s my favorite time of the year. Summer is on the horizon and the air is brimming with fresh pollen and a resurgence of newfound energy. As I make my way up to Alaska for the summer I will be bringing these wonderful albums along with me for the ride. A lot of these releases tend to veer more towards the ambient and instrumental realms as that is where my head has been at lately. However, there are some “rock ” offerings for those who need to blow some steam.
If you still use Spotify I have put together a playlist of my favorite tracks from each of these eleven releases. If you like the music I encourage you to click on the link to purchase directly from the artists bandcamp page, enjoy!
This debut release came to me as a surprise while listening to the Trailhead radio show. David’s approach to primitive guitar is a refreshing guide through the cinematic elements of a hopeless and undeniable landscape. His minimalistic approach to ambient textures, while utilizing synthesizers, melodica, and squeezebox make for a stand out American primitive guitar performance in the modern age.
This carefree psychedelic country rock offering from guitarist Ripley Johnson and co. is a must listen for anyone looking for a trip towards the sun. This meandering jam will weave you in between melodies of radiating spirit, evoking a sense of ones happy place on that sunny spot of the lawn. This is an invitation to hop in the van for a ride without a worry in the world of where the destination might fare, free of doubt in the spirit of the journey.
Another wonderful debut album this time from the Colorado record heads Tyler Wilcox, Stefan Beck, and Jeremy Erwin alongside the adoring Rhythm Ace drum machine by Acetone. This has all of the vibes for taking you in an out of space and time completely. If this record was a place to behold I would want to live there for the rest of eternity.
The duo of Drew Gardner and Jesse Sheppard bring forth another body of work composed on 12 string acoustic guitar, drums, and vibraphone. There’s a calming sense of controlled chaos, with subtle movements swaying between primitive folk influences and ECM worship as the narrative of a red tailed hawk hunts high above the slough.
It’s been over three years since the last Califone record and Tim Rutillis absence has not gone unnoticed. The tone of his music is how I imagine things should sound when I am stuck in deep mud trying to record an acoustic guitar outside. This feels minimal, yet full of life terrestrial weirdness, with familiar sounds of common household items as a percussive narrative of long forgotten treasures.
I can really get behind a musician that is also an engineer, pedal builder, and overall tinkerer and Doug’s music always sounds crisp and refreshing. That’s not an easy thing to do in the world of indie rock/power pop. I believe he recorded this all himself in his home? I should probably get Doug on here to discuss his process but if you love home-made fuzz tones than this album is for you (and me).
A fitting title for a refreshing new approach to the genre. Steve Cioleks voice is a sonic deja-vu of a scene from the past, yet present in what’s starring back ahead of us. As the skies heat up overhead you will need a trusty sidekick by your side and this powerhouse built on the ground of pop melodies will be as good of a guide as any as we lose ourselves in the battle for simpler times.
After 38 years you might think you’ve heard enough but that’s not the case when it comes to greats. If you have yet to dive into their catalog then I suggest you start here and work backwards. I wish that I had found this band when I was sixteen instead of Long Island emo but time is not meant to be filled with regrets. It’s hard for a band of this caliber to top their albums that got them to this point in the first place. However, it’s nice to hear them not care in trying and just write cool songs like these.
If you are struggling to connect with the right therapist while using a 20% off coupon code provided by your favorite podcasts then do I have a solution for you (potentially). Take some mushrooms and throw on a pair of good headphones before pressing play on this album and relish in the moment as you descend past the trailhead of your mind and you watch the world come alive again for the very first time.
I once went to go see Bill play what I thought would be solo guitar music but instead he played samples from a Ramones song of Joey counting in through a strange software that he designed. As “1,2,3,4” blasted through the PA on repeat for an hour, I nearly lost my mind and was completely baffled (as to be expected at Zebulon). This however is much more pleasant to listen to if you need some acoustic instrumentals in your life like I do.
Revered finger style guitarist William Tyler is no stranger to full band performances on his previous records, but this is the first live recording with this new band of mellow horse riders. The Impossible Truth are Luke Schnieder on pedal steel, Jack Lawrence on bass, and Brian Kotzur on drums & percussion. The room was vibrant and William was driving his songs into new territory, guiding us beyond the boundaries of earths painful realizations.
Come join me on a field trip to Syracuse, New York in search of a Yairi…
I have a deep connection to a city that lies adjacent to my home. It happens to be the last stop on the rust belt, known to many as the “salt city”. It’s home to the Great New York State Fair, and is the final resting place for the legendary guitarist Elizabeth Cotten. My hometown of Auburn is just shy of a forty minutes drive west of the fairgrounds and I spent my youth watching Bret Hart wrestle at the War Memorial, to countless weekend trips to the carousel mall with my family. As I grew up I spent most of those impressionable years going to local shows and gigging at the Westcott Community Center, Dinosaur Barbecue, and the frozen tundra known only as the Lost Horizon.
The music community as a whole wasn’t very vibrant. However, there were various scenes with some good things happening over the years. You wouldn’t be out of place while watching a stoner metal outfit play alongside a solo acoustic deadhead at some bar, all while the straight edge hardcore icons play down the block to a sold out community center. Throw a university into the mix and you get a deeply involved city full of hibernating weirdos, looking for anything to pass the time. There’s a silhouette of a troubled skyline enduring the long winter nights, as the streets echo in a cold silence, there are those of us that garner a collection of wonderful and weird old guitars.
There is a place for weirdos such as myself to buy guitars from and that is at Gorham Brothers Music, a family owned and operated music store that was established in 2011. They specialize in used and vintage equipment with some new offerings thrown into the mix now and again, as well as a full service guitar and amplifier repair shop right in store. They even have their own line of custom guitar cabinets (old soul) that are beautiful sounding pieces of furniture, in the vein of what Emperor were doing out of Chicago. I wouldn’t categorize this as the place for lawyers to seek out their next mantle piece, and you’ll understand why when you listen to their band, Engineer.
I had some goals in mind during my trip back home. The first was getting my dad his dream guitar that he saw one day while at Speno’s Music, buying a kick drum pedal for his grandson. He’s been trying to learn for years on and off, struggling to get into a routine. I never really saw myself as much of a great teacher o make him feel comfortable about learning. I am like him in a lot of ways so I knew that all it might take is for him to have the guitar he dreamed to keep hi inspired to keep practicing. His main guitar now is a Guild X-175 Manhattan special in fjord green that is sporting a bigsby vibrato, and it rips.
After trading in an old guitar we had kicking dust for his new Guild I felt inspired to unload another one that I no longer for something that would be used by us both. I was looking for a great sounding acoustic to leave at their house to record with while visiting home and for my dad to familiarize learning on acoustic as well as his electric.
I remember friends raving about how great Yairi’s are during my days of working at the Guitar Center on Erie boulevard, just down the road from the Gorham brothers. I recently found some inspiration after I stumbled upon a great interview that Premier Guitar did with Ben Chasny (of Six Organs of Admittance). He plays a WY-1 model acoustic/electric that was originally designed for Bob Weir of the Grateful Dead. If those two references do nothing for you then it’s also worth mentioning that it’s the only acoustic guitar Joe Bonamassa plays live. Now you better be convinced.
Sadly, there were none to be found in central New York. However, there were similar models for sale over at Ish Guitars, which is a high-end boutique shop also in the area. So I set up an appointment with the team over there at one of the top ten PRS dealers in the world and made my way to Syracuse the following day.
My first stop was for some lunch at the always bustling Brooklyn Pickle, followed by a visit on over to the Gorham Brothers, as a means to distract my wandering mind with more options just in case Mr. Ish was a bust. As I walked through the doors, I immediately felt fulfilled by that familiar, warm, and calming feeling that you get from the smell of freshly roasted coffee, right before the caffeine kicks in (If you find yourself in town, the only cup of coffee you’ll need is from Recess).
Their inventory was plentiful, and as a result my brain needed my body to pace around the store a few times in order to take it all in. After I settled down, I landed back where I started, with a wall full of acoustics by my side. Bobby, one of the three brothers came around at just the right moment to let me know that I could grab anything down that I wanted to play and if there was anything I was looking for to let him know. To which I replied the following…
Hey, thanks! Do you have any Yairi Alvarez’s by chance? Brad: WE DO! It’s right over here on the wall, it’s from 1979 and sounds great.
cue the excitement…
My fingers danced with death as I tried to find it on the wall. When I finally took it down and strummed the first few chords on it I knew that I had stumbled onto special. The sound in my head was exactly what I was hearing in my ears. A warm, yet deep tone as every note hits in uniform, while filling out the many oscillating vibrations of dead wood, resonating beyond thin coats of vintage lacquer. Bobby then gave me all the details and history of the previous owner, which was very helpful because I had never seen or heard of this particular model before. That’s part in due to the fact that there are only 900 of these in existence, this one being number 167 of the batch.
What’s the story with this guitar?
The year is 1979, and it was the 50th anniversary for a particular guitar factory nestled up in the hills of northern Japan, in the town of Nagoya. The late Kazuo Yairi was one of the finest and most successful luthiers of his time as he spent half a century designing and building Alvarez-Yairi guitars. As it goes, the only way to celebrate such a milestone is to build something unique and special for the few that are privileged enough to experience them.
The result was a Limited Edition DY-50 dreadnought, handmade with a solid cedar top and burled mahogany back and sides. The only cedar top guitars that I had played previously to this one were Seagulls. I remember them sounding great for the money but I could never get past the peg-head design. That WY-1 model made for Bob Weir is also made up of a cedar top and mahogany back and sides, so I was getting closer to that sound with this DY-50. The other options down the road at Ish were made of all solid sitka spruce on top with rosewood back and sides.
My approach to buying:
Some of the main factors for me when deciding on a new guitar are as follows:
Do I want to put it down and grab something else immediately?
Do I find myself going back to it multiple times when trying to avoid it?
How many minutes or hours have I spent playing this guitar?
Did any new ideas, progressions, or songs come out of it?
If all of those check off then it’s time to pay up and figure out what needs to happen in order to keep things easily managed in life. I brought a guitar with me that I was willing to trade in. It was an early 2000’s Carvin DC-400 that was custom ordered, directly from the catalog by two loving parents of a young shredder obsessed with Dream Theater. Luckily for me that phase didn’t really stick and I quickly started playing more reasonable guitar with less switches and cleaner pickups.
The brothers were stoked on the Carvin which made me feel better considering it was conceived during an awkward phase during my musical journey. They’re incredible guitars, all handmade with impressive wood grains that were selected for the fastest hands on the west coast. But before I was going to commit to anything, I needed to stop by Ish and play the other guitar that I was interested in. I knew that if I hadn’t done so that the doubt would have wandered around in front of my mind for far too long, and that’s no good for anybody.
Boutique vs. Vintage?
I hopped in the truck and headed down the road to my appointment with the guitar doctor. I was a little early, but I figured someone was probably there. I hit the buzzer and after waiting for a few moments I was let into the showroom floor. I was ushered in by who I assumed was the owner, sporting some big bluetooth headphones and a shiny new watch. He reminded himself of the Carvin trade-in that we discussed over email, but forgetting what it was for exactly. They appear to be very busy over there, which is always good sign for business. But there was no smell of freshly roasted coffee that I could sense, and therefore that calming vibe I previously had down the road was gone.
He showed me to the wrong guitar at first, which was an Alvarez-Yairi master-built version of the same model. After he grabbed the b-stock standard in the back I immediately knew that this guitar was not for me, even before the first note was played. It felt to new and when I did finally strum it the neck was way to thin for my liking. The guitar was setup like you’d expect a new guitar to play; stiff as a dead dog but to factory specifications nonetheless. I responded to his lower off for a trade with a pleasant decline as their guitar was just not meant to be. He did offer to set it up to my “playing style” which was nice of him until he began the upsell phase of his routine, probably late to realize that my carhartt pockets were not deep enough as I was making my way out the door.
I went back to where I felt comfortable doing business and the trade was a done deal. When you’re looking for that new guitar in your life you can’t be inpatient and buy what you think you might need all the time. It takes moments of deeper understanding and trusting in your instincts, but most importantly it helps to play all different styles, letting yourself decipher the good from bad.
I am certain that this Yairi DY-50 will live the rest of its days in the comfort of my home for my father and I both to learn from. And when I am his age, I will look back fondly at this steel string stinger, observing its many signs of wear and tear, as my eyes are reflecting to me in a glare. I’ll think back on all of the good times spent gathered around a melody, with an old stare still glistening from the memories of a cherished past, and for the finish that is yet to be endured.
Here’s a great video of a factory tour done sometime in the 80’s by my guess? I could watch these luthiers chisel wood all day, it’s so relaxing.
Gorham Brothers Music
Syracuse, New York
⭐⭐⭐⭐⭐
Rating: 5 out of 6.
Given the praise that I just gave them in the story above It’s easy for me to want to give them all of the six stars based on my numerous experiences working with them in the past but I don’t think I have been in a shop yet that is perfect. This certainly is the best one of the area and I always look forward to visiting when I am back in town.
Speno Music
Auburn, New York
⭐⭐⭐⭐
Rating: 4 out of 6.
I grew up going to this music store all of my life and they have been around for over 60 years. You got to love a place that’s been around all of this time. They have definitely gotten better with age. They stock what you’d expect a small town music shop would have with some surprises thrown into the mix. They do stock Guild guitars which is a great thing. My favorite part of the store are the rows of record bins and antique turntables, televisions, and other miscellaneous rarities that have been collected over four generations.
Ish Guitars
Syracuse, New York
⭐⭐
Rating: 2 out of 6.
I am not going to harp on this place because it’s just not for me. I am glad that it exists for those that can find what they’re looking for at this shop. They did have an impressive acoustic room but none of the electrics caught my attention at all and that seems to be a really hard defeat to accomplish.
Guitar Center
Everywhere
Rating: 0 out of 6.
Here are some listings that I pulled from the Gorham Brothersreverb page that I’d recommend checking out. I picked one piece that I liked from each category and I think that there is something here for everyone, a true testament to what a great music shop stands for. Happy hunting!
Released in 20201 on Drag City, this is the first solo album for the mastermind behind the experimental project known as Six Organs of Admittance. I believe that he recorded this with a Yairi WY-1 but I am not completely certain. It’s a beautiful sounding body of work that he made as library music. Go beyond the limits of traditional folk, ambient and soundtrack music as you start your morning or embark on a long drive.
There are those records that you revisit throughout your life that instantly take you back to a moment in time, giving you a sense of familiar place. This is one of those records for me. If you like loud rock guitars that could hold their own against Dinosaur Jr, yet played a flair for the more progressive sides to rock than this band is for you.
So for those of you that have been following along with me you have most likely noticed by now that I am living full time in a campervan while traveling the country. What does that mean for my guitar gear and recording situation you asked?
Well, I sold a lot of things and the remainder of what’s still in my collections is either locked away in storage or at a friends studio being used to make records (as intended). However, I have packed enough with me to keep my ADHD riddled brain occupied and in a constant state of creative flow while leaving the windows left open for improvisation.
Learning to let go of certain things was not easy for me, but the goal was to approach this new frontier with minimal choices. In the end it was extremely rewarding and I am making more music now than I ever was when I was working out of an untreated bedroom studio in the heat of Los Angeles.
Now that’s not to say that I will never go back to working in a home studio environment because I am certain that I will at some point. But I do think there comes a time in our lives to shed away that old skin for new (or maybe a haircut will do just fine) and begin again.
During the process of building out our van I had been testing out many different mobile recording configurations and pieces of gear. While I enjoy doing that, it was a bit of an arduous task for me to sort through all of the many options that are on the market today.
I decided to put together this in depth video on my YouTube channel to rundown what I am currently using on a daily basis and why I decided to go down this route. Everything you see in this video I paid for with my own money, and nothing was given to me for review or to create content by any of the companies featured in this video. I just really like this stuff and think you might enjoy it as well.
That’s it, so if you like the video please do me a solid and “like and subscribe” to the Crossed Wires Channel and say hello. It costs you nothing and it supports me in the process and I thank you in advance.
The Gear:
A Tula Mic is an extremely portable microphone and convenient field recorder as well as an interface for anyone needing to record an idea on the go. It can easily connect with a phone or computer for zoom calls or even mobile recording sessions. If you make any sort of content or have conference calls every day, get yourself one of these.
The TX-6 by Teenage Engineering is a six stereo or 12 mono input interface and mixer for live gigs or remote recording. It can easily be used with a phone, tablet, or computer but get yourself a portable floppy disk drive to really get out there without any other devices or distractions. I dare you!
The Mustang Micro Guitar Amplifier by Fender is the perfect little companion to feed off of all that extra case candy you got expired in that crusty ole case of yours. Seriously, everyone should just have one of these in their electric guitar case.
The OB-4 Speaker (also by Teenage Engineering) is just a wonderful gadget to have around your house or with you on camping trips. You can rewind up to 2 hours of audio, cue the radio, get a kick drum beat going, connect with your phone, listen to some mantras, or let it guide you into a deep sleep with its white/pink/brown noise feature. Hey, you can even turn everything into an ambient experience and party like it’s Bandcamp Friday, everyday.
Your Grand Total is $4,130.00 (USD) – ouch I know… let’s try and price together a different kit for under $1,000 if we can.
To keep this theme similar to the TX-6 you can get the Zoom H6 handy recorder and that would give you four xlr/ts inputs and a modular port that comes with an X/Y Stereo Microphone capsule. You already eliminated the need for another microphone right there, with this two for one device. You can even purchase additional accessories for different mic capsules or the option for two more xlr/ts ports giving you six total inputs on a battery powered field recorder. I still have this recorder with me as a backup and I can’t justify ever getting rid of it. It’s a true workhorse in almost every environment and I still use mine often to this day.
Now if you just need a small two channel interface to connect to a phone, tablet or computer I would get the I.K. Multimedia iRig Pro 2 Duo and call it a day. I had this and it worked great for the couple of years that I had it. I used it mostly for gear demos on instagram and recording on the go and it never failed me. (Make sure you stock up on rechargeable AA batteries and protect the environment, please!)
As for speakers I also have the iLoud Micro Monitors by I.K. Multimedia and have used them on several tours when I would bring a mobile recording studio with me for the off days in my hotel room. They are plenty loud and you can get things sounding good enough to send off to someone else to mix if remote recording sessions are part of your gig. They pack pretty easily in a backpack as well.
There isn’t really anything out there that I have found that comes close to doing everything that the OP-1 Field can do (for under $500). But, the Microfreak by Arturia is a lot of fun and a super inspiring instrument to be around. As far as synths go, it does a lot of what Teenage Engineering has done but taking it a bit further down the rabbit hole of synthesis I’d say. The French really do love their weird sounds and I am here for it. I have not owned this yet, but I have played on several at various synth shops during my travels and have come close to buying one before. A lot of people I know have them and rave about how great they are.
I mean for $120 you can’t really beat the Mustang Micro by Fender so let’s maybe see what you could get for a little bit more money and with much better sound quality. Oh yea… the Iridium pedal by Strymon Engineering sounds pretty damn fine. I wish that I had never sold mine but I also have the Quad Cortex, so I’ll stop right now and be done with this.
All of the links to buy these wonderful products will send you to my favorite local synth shop in Los Angeles, Perfect Circuit. If you find yourself driving around tinsel town and need somewhere to go to cure your aching tinnitus, then this is the place for you. Just ring the buzzer and tell them Crossed Wires sent ya.
If this guide helped you in any way please feel free to reach out by leaving a comment below, thank you!
In September 2022 I was on tour with Nine Inch Nails with three days off in a row in Portland, Oregon. I had spent my first day under my usual spells of sleeping in late, followed by an afternoon stroll to get some freshly roasted coffee. I have been fortunate enough to visit the rose city on countless occasions over the years, but this was the most time that I had been alotted to explore it’s offerings while on tour. As much as I am always in search of new experiences, I also enjoy revisiting familiar scenes from my past.
After a damn fine cup of coffee and some lunch, I decided to hop into a cab and cross the river over to Old Town Music, one of my favorite independent guitar shops in the country. They have a great selection of used and new instruments, from old Japanese guitars, to vintage synthesizers, and multiple glass display cases, bubbling over with boutique pedals. This was my third time visiting over the years. In 2019 while on tour with Morrissey, I walked out with an incredible sounding Martin OM-28, which was was my main acoustic for a while, and the guitar I used to record my first instrumental record. It was the guitar that got me back into acoustics, as I had spent years avoiding them. This time around I was keen on finding a telecaster as I’ve had very few over the years, and was looking for something different to record with for my next record.
As I walked into the room with all of the electricity, I was greeted by a late 60’s Baldwin C-1 Professional that Willie Nelson is known for using- a great sounding amplifier that looks like it came out of an old church organ. After gazing at my shoes, I looked up and was eye to eye with an all black telecaster sporting a maple fretboard. It’s a classic aesthetic that I love on a telecaster, but what really caught my attention was the three bridge pickups all in sync with one another. I had never seen this before and you better believe it was a certified Fender made instrument. I immediately took it off the hanger and plugged it into the Baldwin. It sounded mighty and twangy from the get go, just what I was looking for.
After doing some research I found that this guitar was part of a limited run from several years back. Fender had their team of master builders design some lower cost models with custom shop specifications. The neck is described as a fat C, but feels somewhere between a thin 60’s and fat 50’s profile. The three magnetic bars are all custom shop nocaster pickups, wired to a classic Stratocaster five-way switch, with volume and tone controls. My main electric over the years has been a 2006 Eric Johnson Stratocaster (purchased from CME, also while on tour with NIN), so I was looking for similar flexibility over the pickups, but in tele form. Hats off to Todd Krause, the main designer and head of the masterbuilt team for designing this Nashville-Baja inspired Nocaster.
After playing it for over an hour, I knew I had to bring it back to my hotel room and hear how it sounded while recording. If I hated it, I could at least return it before the show day. Oregon is a wonderful state for many reasons, and no sales tax happens to be one of those. After spending the remainder of the night not being able to put it down, I had a feeling that there would be no walk of buyers remorse shame back through the doors of Old Town before I left.
The following morning I clocked out of guitar mode and went for a hike in Forest park, a beautiful 5,000 acre wooded area just outside of downtown. While taking in the serenity of the birds and trees rustling in the wind I decided to reach out to Randall Taylor about getting together for some food and drinks. I have admired what he has been doing with his ambient tape project, AMULETS for years and I figured that this was as good of time as any to meet in person and talk shop.
We met up later that night for dinner at Thai Peacock and quickly discovered that we are both from the same far-out reaches of Western New York. Randall grew up just outside of Syracuse, a forty minute drive from my hometown of Auburn. After spending years making noise in Buffalo basements, he eventually found his way to Oregon and found his calling composing and performing lo-fi ambient music that encapsulates the mood and atmosphere of the Pacific Northwest almost perfectly.
After consuming a delicious bowl of noodles and some yellow curry, we grabbed some Buoy Pilsners to go and made our way to the lobby of the hotel that I was staying at. I am fortunate to get to travel with a mobile studio, so I had an acoustic with me as well as my Old Town “Triple Telecaster” and the new field system fromTeenage Engineering. After showing him the new features on the OP-1, I set up a couple of microphones and we made some noise, played guitars, drank some beers, and discussed his creative process, to working with Chase Bliss on a sound for the Generation Loss MKII pedal.
When you sit down and write music are you trying to achieve a particular sound or are you wandering around an idea until it lands you somewhere?
I feel like it’s a little bit of both- it depends on the song or my mood that day. Sometimes there is more structure. For example, I will take sounds that I recorded from an improv session and sample them onto tape loops. I’ll then arrange them onto the four track so I have four distinct chords or notes, and then playing the four track as instrument can inspire a whole new approach to the song or whatever it is that I am trying to do. Sometimes it can end up being something that I like or not at all, but I will try and record it to tape regardless and see if it feels more lively. A lot of it is just recording an idea to tape and then slowing it down with the pitch wheel and that can make all of the difference.
On the four track are you recording with the pitch knob all the way up for more variation, or are you keeping it center? Is it ever all the way down?
I do that less often because I don’t really like the chipmunk sound (laughs), but it can be a really nice shimmery octave up sort of sound depending on what it is I am going for. If anything it’s the opposite-most times I will record with the pitch wheel all of the way up for more control and subtle pitch shifts. Another thing I will do is physically manipulate the tape by crunching it up and putting it back into the deck to see how it sounds. I have a lot of pre distressed tape loops that are textured. Some are broken, and I will record to those as it chops up the sound into fragments along the tape and that can sometimes result in some very interesting sounds as well.
How did you approach getting that mangled tape sound into a pedal format when working on your preset for the Chase Bliss Generation Loss MKII?
They had a lot of parameters already set in place. Part of that was the destroyed tape sound that I mentioned. I had sent them samples of what I physically used and I think they tried to emulate some of those sounds as well. With my model, it wasn’t intended to emulate a specific tape machine (like a four track or Walkmen), but rather an imaginary tape player that you would find at a thrift store. The battery would be dying, the tape head is almost worn out, and it has this degradation and feeling that is hard to capture and sustain with anything else. I wanted to make a sound that was kind of broken like that, but consistent, because in a real thrift store machine that is on the verge of not working there is that sweet spot, and that’s the sound that I was going for. I believe the model on the Gen Loss is called broken even (laughs).
How do you feel when your performing live? From my experience playing instrumental music, it can be rather daunting and even anxiety inducing at times. Can some people not be as receptive when you show up with a briefcase full of mangled cassettes and a four track?
It’s an interesting thing when people realize that the sounds you are making are on purpose. I think it’s all about the venue for me at this point. I learned a lot from booking my own tours, and playing a lot of shows that I didn’t enjoy- like in a noisy bar or in spaces where people didn’t want to hear gentle ambient music. I get it because most people didn’t come to a bar to hear background music, but now I am a bit more selective of where I am going to play and that feels good right now. I used to feel bad when I would set myself up for disappointment- playing in a noisy bar on a Friday when nobody cares, after I drove six plus hours, but you have to play to your strengths in a place that you are comfortable performing. Play in a space that feels good to you, and to the audience.
Do you think living where you live has an effect on the style of music that you are making?
I was already beginning to develop it when I was living in Austin, but I think since moving here it has felt like a warmer welcome for my personality and my music. Everything sort of fits here. My music has always been inspired by nature and my surroundings, so the moodiness of the Pacific Northwest helps. I don’t think that my sound fits in a sunny southern California setting; it’s misty, slow, and grey.
This beer is kicking in now and it’s very crisp and refreshing!
It’s one of my favorites, Buoy out of Astoria. All of their beers are really good and if you ever get to Astoria its a beautiful place. They have a brewery there right on the the pier, a perfect spot to post up by the water, it’s really nice.
I will add that to my list of places to go. Do you have a nature spot around the city to escape when you need to?
I go to Forest park a lot, its a huge forest right in the middle of the city. I love going out to the Gorge, and to the coast as well. From my house I will walk to Laurelhurst park, it’s forested but also very open, the best of both worlds really. During the start of lockdown, I walked there every day as it was one of the only things I could really do. I would go there and work on my last album, “Blooming”. I would write in the morning, then take a walk and sit there for a while and then come back home to record some more. I think I recorded that album really fast because there was nothing else I could really do, no other distractions.
What’s next for AMULETS, are you working on any new projects or does it come in waves for you?
I recorded a new album that I’ve been working on for over a year now. It’s been a slower process than previous albums as I am taking my time with it. Im going to go mix it next month in Rhode Island at Machines With Magnets studios. The Flesner will be releasing it at some time in 2023 depending on vinyl pressing plants and what not. I’m also working on a few movie scores which I am really excited about as well.
As our discussion carried on for a couple hours, the beer cans were emptied, the battery on my OP-1 died, and the “Triple Telecaster” from Old Town was all twanged out of tune. It was late and the guests were getting tired of our discussions on what overdrive pedals we preferred over the tube screamer. Randall came out to the concert the next day and it was a euphoric experience for him seeing one of the bands that inspired him to get into recording with tape machines in the first place.
Old Town Music
Portland, Oregon
⭐⭐⭐⭐⭐⭐
Rating: 5.5 out of 6.
An almost perfect shop that’s thriving in the ever vibrant city. I have bought two guitars from them and both times were a pleasant experience. I love a shop with multiple rooms to get lost in, and I’ve had my fair share of hours spent behind these walls. Add this to your list of places to visit while you’re in town, after you hit up Powell’s books and Pine State Biscuits of course.
Randall Taylors first release on the Flesner brings forth funeral songs of the many salvaged tape machines amidst the gloom of a long Pacific winter. Death brings on new life with a spring of synthetic birdsong, easing a calming reflection, weaving in and out of darkness in a landscape filled with desperation.
The power section is the heart of any electronic device, and without that pulse, you can’t accomplish anything. No power means you’re missing out on all the fun of having one of these toenail smashers – which is to make some noise, impress your friends, make new friends, and at the very least, have an adequate replacement for lost nail clippers.
There are countless options for power supplies, and they all have their features, advantages, and disadvantages. If you find yourself building your own from scratch or revamping an existing board for the sixth time, it’s safe to assume that you have a heaping pile of pedals on the floor beneath you. When you get a sense of what is making it into the final layout, it’s good practice to lay everything out and arrange it to look appealing but functional to your needs before locking everything down. I’ll dive deeper into signal chain and cabling in the future, but from here, you should assess how many pedals you have with each of their voltage needs, polarity, and how much current (milliamps or mA) they draw.
“But wait… what does any of this even mean?”
HOW MANY POWER SUPPLIES ARE THERE?
There are two types of power supplies: Switch mode (typical Wall Wart) andToroidal (or Linear).
I would steer clear of the wall wart supplies when creating pedalboards as they make noise. However, it’s fine if you’re powering one pedal or daisy-chaining several analog pedals. If you’re using digital effects that require their power, this approach will not work.
Linear supplies are great, and I personally use them exclusively for pedalboard builds and with all of my systems. They are widely praised due, in part, to their use of isolation transformers, delivering clean and quiet power.
(Something to keep in mind is that not all power supplies with multiple outlets are isolated. The cheaper ones pretend to be big kids in their older sibling’s clothes, but they’re still just as pesty).
VOLTAGE (V) AND MILLIAMPS (mA)
Volts refer to the amount of voltage a pedal requires to function. You want to always ensure the voltage from your power supply unit (PSU) matches the voltage of the pedal. Not doing so may damage the pedal if you overpower it, and that’s bad!
Milliamps refer to the maximum current/amperage your pedal needs to behave as intended. You want to at least match the mA, but it’s good practice to have more on the PSU than needed.
For example, if a pedal or PSU has a reading of 9v at 250mA, you want to match the volts (9v PSU to the 9v pedal) and have a reading of at least 250mA from the PSU.
POLARITY EXPLAINED
Similar to batteries, every DC pedal has a positive and negative power rail, and like batteries, the correct rails need to be properly assigned to the pedal. The most common polarity for pedals is center negative (-), meaning that the middle pin on the DC plug is negative (or ground), and the outer barrel is positive (+).
However, not all pedals are created the same, and some require center positive power (like the Eventide H9). If you’re unsure about your pedals’ polarity, retreat to your owner’s manual.
WHAT IS THAT PLUG?
There are three types of DC plugs…
2.1mm Barrels: most common, often center negative but not always.
2.5mm Barrels: often center positive (Eventide H9) but not always.
3.5mm Jacks: you’ll see these on the ProCo Rat, old Ibanez pedals, the KLON, Vintage Tube Screamers, and others. They’re often center positive, but not always, so check the manual.
If you’re ever unsure about power regarding a pedal, don’t make any sudden moves and sit back with a cup of coffee or tea, recollect your thoughts, and dig back into the owner’s manual to find out more information. If you’ve lost the manual or your pedal never came with one, you can always trust in the powerful search engine BING for all the right answers. If you’re still coming up empty after doing all of the above, you could get a milliamp meter to measure the right milliamps (mA) that you’ll need to power your pedals.
POWER SUPPLIES I DIG
Now let’s get to the fun stuff. Here are some isolated power supplies that I recommend. I own all of these and use them regularly, so let’s dive in!
Strymon Zuma & Ojai: These are my personal favorites as they check off all the boxes for me. They are the lightest units I’ve come across due to their aluminum chassis while still distributing high current draw. They are more energy-efficient and can deliver power to your pedals while overseas (with appropriate IEC cable). These have exceptionally low noise due to dual isolation. Each of the nine outputs is isolated from the 24v DC, and the 24v DC is isolated from the AC input, eliminating ground loop and line noise issues from the alternating current.
The Zumaand Ojai R30 have two channels of selectable voltages for 9v, 12v, and 18v pedals. The Zuma R300 has one channel, while the Ojai is perfect for small boards with up to five – 9volt pedals. The best part is that if you run out of power, their entire system is modular, allowing you to expand if you need more. You can add more outputs to the Zuma by connecting an Ojai or Ojai R30 with the 24v Out jack. I have built a pedalboard before with one Zuma, an R30, and two Ojai’s all connected to each other and didn’t have a single ground loop or noise issue. The power cables they include are also very nice, with plenty of options for length depending on your needs.
CIOKS PowerMax: I have only had one experience with this company, and that is with the PowerMax (version 1) that came with my Eventide H9. It’s my second favorite PSU and is currently housed underneath my travel pedalboard (a Pedaltrain metro). The design is more rugged than the Strymons, a bit heavier, but the height is much thinner, allowing it to fit snug under flat pedaltrain style boards. It has plenty of options via the selectable dip switches for different output voltages such as 9,12,15, and 18V. I like the dip switches because it’s not easy to get your fingers in there to select voltages, meaning it’s harder to accidentally switch the output to the wrong voltage. You wouldn’t want to give your rare vintage pedal 18 volts if it didn’t ask for it. From browsing their website, it appears the team over at CIOKS has made a power supply for every type of person out there, so you should have no trouble finding the right PSU for your needs if you go this route. My only gripe is that the output connectors are RCA which is a bit annoying if you run out of their proprietary cables, I would suggest ordering spares.
Voodoo Lab Pedal Power 2 Plus: This was my first power supply, and it still holds up to this very day. It’s like the Boss compact pedal in the PSU universe. They rarely fail, and you see them everywhere for a reason. The dip switches on the bottom make it easy to power vintage Boss pedals (12v ACA) and high current 9v pedals like the Line 6 DL4. It even has a unique feature that allows you to drain or sag the voltage between 4 and 9 volts giving you the “dying battery” sound. With custom cables and adapters such as a Voltage and Current doubler, you can use any of the isolated outputs to run 18 or 24v pedals and get more milliamps if needed.
T. Rex Fuel Tank: This was one of the first supplies I recall having a switch for 220v power. I relied heavily on this red brick back when I had a small board of essentials while touring internationally. The trick is remembering to switch it back when you’re back home. Hence, I really like the Strymon supplies as the internal IC chips do all of the power switching for you. That being said, I still have my Fuel Tank, and it has never failed me. It’s actually looking at me right now and wondering what I’m saying about it. I’m not afraid of you, Rex!
Ernie Ball Volt: The Volt is simple and with little to no fuss about it. If you’re looking to power a small pedalboard and keep things easy, then this is the best bet for the money. Each volt has four 300mA 9v DC outputs and one 18v thru option. They can even be daisy-chained together, giving you up to ten power outputs. Their footprint is smaller than anything I’ve come across, making it a great travel companion to throw in a guitar case.
Danelectro Battery Billionaire: I find this is a very useful tool to have around my shop, and it comes with me on the road. There’s not much to it, so it makes for a very fast and reliable option when I need power in a hurry. Players I work with often like to swap out different pedals during rehearsals, so rather than wasting time finding power cables that are tucked away on their board, I’ll resort to my friend, the billionaire (if voltages are applicable).
If you use a lot of vintage pedals that are not modded with modern power inputs, then one of these would come in handy. Rather than unscrew the backplates on your Superfuzz every time a battery dies, you can just run it into one of these instead. There is even a switch on the side to turn off the unit so you can keep your patch cables plugged in and not drain power from the batteries. Generally, I would probably never put this on a touring pedalboard, but If I threw together something with four vintage pedals that all accepted 9volts, this would be a great option with an old-school vibe, no wall plugs, ground loops, or line noises. Now I kind of want to build a pedalboard with one of these.
Strong arguments have been made over the landscape of modern day popular music that the guitar went extinct during the last epoch. However, if there has been one prevailing notion during uncertain times it’s that art and music can serve as medicine for the mind, body and soul, and for me that was “Guitar Music” specifically.
I rested heavily on instrumental and ambient music to ease the circulating madness around me and buried inside. As some were lost in the depths of tiktok, I was walking around with headphones listening to anything that wielded the powers of escape, all while gazing at the morning action around my hummingbird feeders. I found my musical choices to be rather calming during times of mental chaos and in response I fell back in love with the guitar as I have spent many years pushing away due to an immense amount of overexposure in my professional career.
It’s easy to overlook the guitar as a stand alone instrument as it has been overplayed and dramatized more than I care to recount. But there are breakthrough moments when it serves as a voice, rhythm, and melody, like it has for generations while also being driven further as a utility creating new sonic textures and emotions, similar to the expressiveness of a six voice synthesizer rather than the mundane strum of a G chord.
As I started to compile together my year end list I quickly realized that the majority of what I was enjoying was based around guitar performances. Rather than talk about other records that I appreciated but ultimately steered away from to feed my particular craving. So, I figured it would be best to stick to what I know. Some of these artists express the ideas of minimalism and experimentation while others are rooted more towards traditional styles but with a modern spirit, all the while bringing forth a sense of place and purpose in moments of confinement.
These are ranked in no particular order and if you care to listen along I put together a playlist with a favorite track from each of these records, enjoy.
Yasmin WilliamsUrban Driftwood
Yasmins compositions are purely meditative with soothing tones, texture and layers that embody a sense of familiarity but are far from derivative. This is fingerstyle guitar at its finest with complex polyrhythms blending acoustic guitar, harp guitar, kora, and kalimba with subtle variations often highlighted by Djembe, cello, and cajon. Williams’ music will persist on inspiring, showcasing her spirit throughout each movement, leading one to dig up long forgotten memories, and finding solace as they are replaced with timeless melodies and rhythms. (Spinster)
Nate Mercereau Duets | Golden Gate Bridge
A haunting display of guitar synthesizer alongside the reverberating drone of the Golden Gate bridge, which may be the largest fabricated wind organ, and conveniently powered by nature during this brief moment in time. There is a lesson to be learned here and that is to appreciate nature not only for it’s captivating beauty but also for its mysteries that lie underneath all of the darkness when faced with large standing monuments of human creation. This is truly a recorded artifact of the times we are enduring, however emotional and painful it can be, hope and beauty still emanates off in the distance. (How So)
Mdou Moctar Afrique Victim
If you’re like me and not as well versed in African music as you aspire to then I would suggest Afrique Victim as the gateway, canepaulting you into the world of West African music and culture. Mdou melds virtuosic guitar playing with hypnotic rhythms, field recordings, and noise bringing to the center a deep meditative expression that goes beyond the music. There are themes in these songs that will live on through the ages. Thank you Superwolves for pointing me in the direction of Mdou Moctar. (Matador)
Charlie Parr Last Of The Better Days Ahead
This is a poetic reflection on a life lived while also looking ahead at what’s still to come. With sparse production and gritty vocals over adept acoustic guitar playing that reverts back to old folk and blues themes, Parr says it best “…the album represents one full rotation of the boat in which we are adrift-looking ahead for a last look at the better days to come, then being turned around to see the leading edge of the past as it fades into the foggy dreamscape of our real and imagined histories.” (Smithsonian Folkway Recordings)
Jeff ParkerForfolks
This December release makes the cut and when you listen to Jeff’s playing you will understand why. A masterful improviser in jazz and experimental folk with a natural sense of ambient textures but without the splattering of effects processing. Throw this on at the start of your day, served with a morning cup of hot coffee or tea, with the sun rising and bleeding through the residual gloom of dusk, and zero ambition to complete your daily tasks. (International Anthem Recording Co.)
Steve Gunn Other You
Gunn is back with his sixth studio album packed with eleven tracks of blissful melancholy, soaked in California sun with an inspiring new approach to his music. There is a soft touch in his playing throughout this record while still holding onto a sense of clarity and brightness that will leave many wanting to stay in the moment. A perfect album to listen to while on a stroll through a beloved park on a brisk fall day. (Matador)
Marisa Anderson & William Tyler Lost Futures
The duo’s first collaborative effort melds their singular voices into lush panoramic compositions that convey the narrative of interrupted futures with the use of textural drones, rhythmic echoes, and disruptive harmonies that embody growing tensions during uncertain times. Together they have created a body of work that not only reckons the mounting pressures but also the joys of newfound friendship and gratitude for playing music together. (Thrill Jockey)
Hayden Pedigo Letting Go
A refreshing, and modern approach to the American primitive style of guitar picking while blending experimental sound design and manipulation tactics. Pedigo possesses a lighter touch compared to the Tacoma school of thought, allowing for more dimensional soundscapes with cascading compositions that reflect a longing to escape while reconciling with the past. (Mexican Summer)
Laurel Premo Golden Loam
I will admit that I probably would not have found this album if it wasn’t for a Spotify playlist. Jericho sprung me up from my usual morning slump and closer towards my stereo, thumbing along with an acoustic to what I was hearing. I probably listened to that song forty times or so that day and it always felt like I was hearing it again for the first time. Premo focuses deeply on familiar tones rooted back in time, Golden Loam brings forth a multilayered culmination of folk with soothing drones and haunting lore, cascading dynamics and elevating warmth that will leave a lasting impression. (Laurel Premo Sound)
yes/and yes/and
A partnership between Meg Duffy (Hand Habits) and producer Joel Ford, yes/and is a result of intricate fingerpicking and detailed electronic textures. An experimental study on dissonance and beauty, with interrupted soundscapes and soothing guitar melodies all buried underneath the rubble of discarded electronics from the eighties. (Driftless)
My first pedals were a DOD Grunge overdrive and a Dunlop Cry Baby. I was drawn to the aesthetic of those early DOD pedals because they told me exactly what I was getting myself into. The sound wasn’t great, and my Hendrix-inspired wah-wah did not mix well with the attitude of Kurt Cobain trapped inside of a purple and black box with the settings of “loud, butt, face” and “grunge” maxed out. Now that I am reflecting on that time, I like to see myself as a young avant-garde noise artist playing one-person shows in my parents’ basement, but truth be told, I was really just butchering Black Sabbath and Green Day songs and forgetting to turn off the damn wah pedal. I quickly ditched those pedals as they did not convince my parents that my guitar lessons were worth the investment, so they stayed stashed away in my closet until deemed worthy again years later.
Growing up, pedals (especially pedalboards) were a bit of an enigma. I have no memory of my parents ever getting me my first pedals, as they very well could have been lent to me by a friend. It was only when I grew a bit older and was allowed to go to the magazine section alone while my parents shopped for groceries that I first stumbled upon what some of my guitar heroes were actually playing. The typical gear setups I would see illustrated in the back of Guitar World magazines were racks of digital effects processors, preamps, power amps, and full stacks. The first pedalboard I remember coming across was in an interview with J Mascis of Dinosaur Jr, and it was at that moment I gathered some sense of clarity. Pedals tell you precisely what they are, either in their name or simply by design. Rack-mount effects processors were more challenging to conceptualize for me early on. Until that watershed moment, I was under the impression that they were the only way to experiment with guitar effects.
From that moment forward, I went down the rabbit hole of guitar pedals, from trading with buddies, buying and selling, to eventually building pedalboards for myself and my clients. Now the tides have turned, and pedals are more popular than ever, but that doesn’t come without a cost. There are probably twenty pedals (at least) for every single type and far too many influencers and paid ads giving off the wholesome impression that you need what they’re selling you. Yet, some people can make sound and express their art with an old gas can, some fishing line, and a few pieces of wood, not because someone sold them the idea, but because they strived for that feeling of expression by any means necessary. That is what makes art human.
The next time you find yourself hiking, surrounded by beautiful scenery, and all you’re thinking about is that next pedal on your watch-list, I want you to stop and rethink where you are. Most of the time, we want something we think we need to become a better player or sound better when we just need reliable tools for the job. Should you spend all of your savings on a Klon Centaur because everyone on Instagram subconsciously suggests you do so? Do you buy a Blooperor a Microcosmonly to realize you have no loops or bloops left in you after reading the manual?
Everyone learns in their own way. Some don’t want to be told how to go about certain things and leave lessons learned in exploration and experimentation (myself included). Others may want to skip the long hours filled with headaches due to an overabundance of coffee and trust in what they already know and are comfortable using. With this guideline, I hope to convey a sense of where one might begin when piecing together their sonic arsenal in the form of the ever so popular and no longer elusive pedalboard.
Below is a list of some of what I believe to be essential pedals for any player. I have owned most of these and have used all of them. Are there better options out there? I am sure of it. Do you have strong opinions that some of these pedals are horrible? I am almost certain that you do. This post is more about letting go of what we think is cool and eliminating some doubt or confusion to allow in some room for more freedom and creativity without the pressures of conformity.
TUNERS
Yes, you need one and if you think you can get away without it because you enjoy clipping your Snark onto the headstock of your vintage Jazzmaster, then stop reading this now while you’re ahead.
Korg PitchBlack Custom: Bright and easy display with options for strobe, half strobe, meter, and regular. Accurate tuning as well as an adjustable calibration.
Boss TU-3: You will likely never need to buy another tuner if you go this route. They’re rugged, accurate, and will last you a lifetime. (Just make sure you don’t accidentally set it to 1/2 step down when your band plays in standard tuning; they will never let you forget about it).
Ernie Ball VPJR/Tuner:If you’re worried about saving real estate on your board for that fifth overdrive, then this is for you. The tuner is not the most accurate, but you now have that fifth “transparent” overdrive in your chain, so what have you got to lose? (Transparent has zero meaning when used throughout this article.)
FILTERS
A Filter is when your signal is enhanced by adding or removing specific frequencies. It doesn’t work like a typical EQ, as an envelope filter is dramatically different. Instead, most Filters use an LFO (low-frequency oscillator) which adds movement to your sound, enhancing notes to produce vowel-like sounds, similar to human vocals.
Typically filters run before drives as you’d normally want to filter the guitar’s direct signal, unaffected by the other pedals in your chain, but that is my preference, and there is no harm in throwing a wah at the end of everything. It probably sounds cool, depending on what you’re doing.
Boss AW-2 Auto Wah: More of an envelope filter, simple and easy to dial in.
DOD Envelope Filter: Another classic envelope. The bass version is best for bassists.
Ibanez Weeping Demon: My favorite wah pedal. You can pull a lever to park the wah on the exact frequency you want and even bypass it with a separate switch.
PREAMPS / OVERDRIVES / BOOSTS
Who’s on first? Who’s on second? Does my boost come before my fuzz? Do I need a buffer? I say this with all transparency as I don’t know what you will like, but I can suggest that you try them all and in every way possible. The right decisions will be yours and yours alone to make. For now, here are some great options and a couple of personal favorites.
Boss SD-1: A classic, it has a buffer and will change the sound of your guitar’s natural tone, but chances are if you choose this pedal, you don’t care about that sort of thing anyways, and you just want that extra crispy overdrive for those fingerstyle licks.
JHS Colour Box: A Neve in a box and plenty versatile for guitar, bass, synth, and even vocals. The EQ is the real selling point, and Version 2.0 has even more precision with its EQ shift knobs. This pedal is a good option if you want that “direct-in” guitar sound used and loved by many. [Tech Tip: if you’re typically bothered by hiss, I would suggest getting a line isolator box or a different preamp pedal altogether as this thing’s known to be hissy, similar to the real thing.]
EarthQuaker Devices Palisades: Truth be told, I was never much of a Tube Screamer fan until EarthQuaker Devices released this pedal. The Palisades covers every TS option known on planet Earth, and if that’s too much for you, they made a stripped-down version (Dunes) that kicked butt and is sadly now retired. You can find them used obviously, but why did they stop making this? Hello? Are the powers at be reading this? I saw that Reverb.com made a movie called DUNE about this pedal. Has anyone seen it yet?
Bowman Audio EndeavorsThe Bowman: If you’re looking for that Centaur sound and live in reality, this is your best bet. I will also add that this is hand-built by a great guitar player and an even better human, so you get the best of both worlds with this Klone. These sound best used as an overdrive but do a clean boost very well. So if you can only have one from this list, I vote Bowman.
MXR Micro Amp: Another tried and true classic. If you want a clean boost at the beginning of your chain or a swift kick in the rear after eating dessert before dinner, then this is your golden ticket, Charlie Brown.
DISTORTIONS / FUZZ
The Rat: This is one of my favorite pedals of all time. The Filter knob (sometimes referred to as the Tone knob has a great sweep, allowing you to precisely dial in your distortion to cut through or sit back in any mix. If you’re brave and really crank this pedal, it sounds truly wild and loud. [Rumor has it that when the engineers at Line 6 first heard a Rat, they said to themselves, “This sounds INSANE” but could not face the reality that a filthy rodent could make such a sound. So, they cloned and mutated one of their own, and thus the Spider was born.]
Ibanez FZ7: An inexpensive solution for 60’s inspired fuzz tones. The speaker cranker setting adds a tight gate to the signal, which is a lot of fun for fast-picking attacks when soloing. The best part is that once you dial in your settings, you can press the knobs down, and they will never move. How come this didn’t catch on more? [Tech tip: the footswitch isn’t great, and you may have to replace it at some point in the pedal’s lifetime].
EarthQuaker Devices Hoof: A replicant of the green Big Muff made famous by Electro-Harmonix in Russia. What more do I have left to say about the big Green Muff, other than everyone should have one, and this is an excellent alternative to the real thing.
Voodoo Lab Superfuzz: If your budget is tight and a Univox SuperFuzz is out of the question, as it is for most of us, this is a great and inexpensive alternative. No, they don’t just make boring old power supplies at the Voodoo laboratory; they have some great pedals for not a lot of money, so check them out!
MODULATION EFFECTS
Phase was one of the earliest guitar effects, and the intention was to imitate that of a Leslie (rotating speaker), a sound many strived for, and in time the Phaser pedal was born. The guitar’s signal is split into two separate paths; one is filtered and then combined with the other signal, allowing one to cancel the other out when the frequencies are out of phase. This signal modulation gives the impression that the sound moves away from you and comes back.
Boss PH-1: The OG Phaser. This one set the bar, and some have never looked back.
Ibanez Phase Tone: Another early phase but with added width control.
Electro-Harmonix Small Stone: It’s another classic, simple pedal design with a switch to control the rate. You can’t go wrong with a pedal with only one knob. You just can’t.
A Flanger is when two identical signals are mixed together, with one playing at a slightly slower speed. Because one playback speed is slower, the two signals will continue to increase, creating a swooshing effect similar to the sound of a jet engine.
Ibanez FL9: More controls, same jet engine sounds.
A Chorus effect will alter the sound of the original signal from your instrument by adding a secondary sound with subtle variation in pitch and a slight delay. This effect creates a similar sound to a 12-string guitar that naturally gives off that chiming tone due to their paired strings with subtle differences in tuning and attack time. Through a stereo amp, such as the Roland JC-120, for example, the chorus effect adds a lot more space and depth to your sound. If you ever get a chance to play one of these amps, I suggest adjusting your volume to a reasonable level and proceeding to sit down with your head in front of the two speakers (directly in the middle). And, while on the clean setting, play your instrument, turn on the chorus, and you will hear exactly what I mean by spacious and lush sounds.
Boss CE-1:I really like Boss pedals. They seldom break, and they’re both ugly and elegant in all the right ways.
Electro-Harmonix Small Clone:Another one-knob solution from the sonic sorcerers and most notably made famous by your local used selection at Guitar Center and that 90’s cover band down the hall from your practice space.
MXR Analog Chorus:I almost forgot about this pedal and then stumbled upon it while writing this article. They’re cheap and good, offer many options to craft that perfect chorus sound, and even have a thru for running stereo chorus to another amp.
Boss DC-2W: This pedal made the list because it has ZERO knobs! You can’t tweak anything. All you get are four switches and a recipe for the cure to that boring clean tone you had before owning this pedal.
Tremolo is an effect that rhythmically changes the volume of your signal. An LFO (low-frequency oscillator) turns the signal up and down. The traditional tremolo effect is typically made with sine or triangle waveforms. Sine waveforms are lush sounding, while Triangle waves are linear, creating peaks and valleys that easily cut through a mix. Typically a tremolo will allow you to adjust the “rate” (speed), and “depth” sets the limit of volume loss from minimal to completely killing the sound.
Boss TR-2: A classic, simple, it’s what you want when you think tremolo.
Strymon FLINT: Fender-style amp tremolo and reverb in a box!
Vibrato is when the signal from your instrument shifts in pitch from the note you are playing. You can do this with your guitar’s vibrato system (often referred to as tremolo, but it’s not). You can also adjust the frequency of the pitch, speed and even change how far the pitch will shift.
Boss VB2-W: They finally reissued the much sought after and overpriced VB2. This new version faithfully reproduces the original analog circuit and a new mode with a unique filter wave and real-time expression controls for the vibrato depth.
We have been fascinated with audio delays long before the infamous Memory Man and his voyages to the space station. But if I had to guess, I think we first became fascinated with these sounds by shouting into expansive natural formations such as cave dwellings or vast canyons. However, It wasn’t until the 20th century and the evolution of audio recording technology that musicians were first able to interact directly with a version of their own playing. With tape being the principal recording method of the time, tape delay units like the Roland Space Echo and Maestro Echoplex became notable in the 1970s. Technology continued to advance, and by the middle of that same decade, bucket brigade chips became the answer for tape-like analog delay in a compact format (in walks the Memory Man). Soon after that, the ’80s arrived, and digital effects processors took over. Though great in their own right, they never quite got the authentic sound of tape and analog delay.
Line 6 Echo Park: Move to Los Angeles, buy a Stetson, and get yourself one of these multi-purpose, reusable echo machines.
Ibanez Echo Shifter: It’s echo and modulation in a slick design with a fader for delay time that looks classy as all heck.
Danelectro Reel Echo: A pretty good interpretation of an Echoplex for not a lot of money, and it’s seafoam green.
Boss DD3: Probably everyone’s first and, for some, their last delay pedal ever.
Reverberation effects and echo are similar; they both happen after a sound has been made, but beyond that, they are very different. The echoing sound is distinct from its source, sounding clear due to the magnitude and distance it travels from the source sound. Reverberation happens when sound continues due to repeated reflections after the sound source has stopped. These sounds are more difficult to hear as the reflections keep repeating, creating a muddy sound due to sound waves reflecting off of multiple surfaces. Spring reverb is a relatively simple and inexpensive method for creating this effect. In the 1960s, the Hammond Organ Company was the first to develop a compact reverb unit for their organs. It was so successful that they released it as a separate hardware unit, known as the Accusonics Type 4 Spring Reverb. Who was one of the first customers of this soon-to-be prized guitar effect? Leo Fender installed these tanks in the 1963 Vibroverb guitar amplifier, bringing more depth and sonic space to guitar music, with Dick Dale being one of the first users to pioneer this new technology in a guitar amplifier. Much like delay in the 1980s, digital reverbs became a desired effect in their own right, emulating the sounds of spring, hall, plate, and gated reverbs.
Boss RV5: This does everything but digitally, spring, hall, plate, modulated, gate, and room reverberations.
Malekko Spring Chicken: This is the closest pedal to an analog spring reverb tank that I have come across so far. I do love a one-knob pedal.
EarthQuaker Devices Dispatch Master: This one combines the best of both worlds; digital delay and reverb in one box that you can’t beat for the real estate, price point, and ease of use.
UTILITY
Loopers: It’s simple, you stomp record, you riff, then you hit stop, but you still hear yourself even though you’ve stopped playing. The fundamentals of audio recording are right at the tips of your big toes, giving you all the power for creativity, jamming, and nonsensical guitar solos to impress nobody but yourself.
T.C. Electronics Ditto X2: An easy and fun to use looper with ½ speed mode for tape loop-like drone sounds.
Line 6 DL4: I mean, this one may be in my top five of all time. It’s got a 7-second looper, analog, and digital delays all in one big ugly and beautiful green enclosure.
Other:
Electro-Harmonix Freeze: It’s great for sustaining notes or drones and is very useful for solo acts or bands that don’t like talking in between songs.
Effects Loop: Are you curious about effects loop but don’t have an amp with an effects loop? Try one of these pedals. They’re very handy for many reasons, but I like to run certain pedals into one of these to keep them out of my signal chain when I don’t deem them necessary.
Xotic Effects X-Blender: This one has a big wet/dry knob and even a boost/EQ section to really make your presence known.
What’s Next? Signal Chain, Power Supplies, Cables, and more…
I will save the details for part two, but something to keep in mind when plugging all of this stuff in is to have fun and experiment. Don’t dive in too deep. Start with one pedal and then plug in one or two more and see how they work (or don’t work) together, change the routing and jot down some of the sonic differences if that helps. A good guideline for signal flow would be to follow the order of everything listed above and make changes from there. So, I’ll leave you to it,, and feel free to share your signal chain in the comments section.
A digital multimeter is one of the most useful tools for anyone working on electronic instruments. They are used all across repair shops, on the road, and can always be reliable in dire situations. This is a must-have tool for anyone getting into electronics or at the very least curious about how their instrument works and want to know more about how to troubleshoot problems on their own. Best of all they’re not expensive either; this one that I am using on these examples costs less than $20 and you can find it on Amazon (photo 1). StewMac also offers two great options as well, one for guitar repairs and another suitable for building amplifiers.
Let’s explore some ways to use a multimeter:
Testing a guitar cable
Testing pickups
Testing batteries
Testing power supplies
Mapping out a wiring harness
Testing a guitar cable
We’ve all been in situations where you plug your guitar in, turn on your amp, roll the volume up, and get hit with a sudden lack of sound. It can be rather humiliating if you’re not the only person in the room. It’s easy to get your mind wrapped up by asking yourself too many questions at once. Is my amp blown? Is my output jack cutting out? It’s good practice to remain cool in these situations, avoid panic and anxiety and just start with testing your cables. Oftentimes they just get unplugged without anyone noticing, but if everything is where it needs to be and there is still no signal it’s time to get your multimeter out and do some cable testing.
Set your multimeter to test continuity, then touch the tips of both cable plugs with the test leads.
Testing pickups
If you’re like me and swap out pickups regularly or buy used pickups you will save yourself a lot of trouble and money by testing them with a multimeter. Testing a pickup is a simple process. Set the multimeter to the ohm setting and touch the red test lead to the pickups primary lead (hot) and the black test lead to the pickups ground wire (photo 4). If you’re testing a humbucker with four conductor wires you must make sure the wires are properly connected to one another.
A multimeter will tell you a lot about a pickup before you wire it into a guitar. For example a typical humbucker measures around 8k of resistance for vintage style to anywhere up to 25k for high output. Single-coil pickups measure from 6k (vintage) up to 16k (high output). Some other oddball pickups found in vintage guitars can give an average reading of less than 6k but if you get a reading lower than 2k (or a reading that’s all over the place) you have a dying pickup. If you’re testing a new pickup result to manufacture for its exact resistance (find it on the box or website) make sure you have a close enough match.
Testing batteries
The days of touching your tongue to a 9-volt battery are over and might I add that it was never sanitary or accurate either to begin with. A lot of vintage pedals and even some modern boutique pedals still have the option for batteries and if you don’t use many pedals in your rig you might still rely heavily on them. You can save yourself some money (and save the environment) by testing batteries and not throwing them away when there is still enough juice to power your pedals. Nowadays, most people run several pedals if not more and in such cases a power supply is recommended for pedalboards and large signal chains.
With a multimeter you can test just about any type of battery: AA, 9-volt, lithium, or a disc battery. Set your multimeter to the DC V setting (and to the appropriate voltage range if your multimeter offers it). Touch the red test lead to the positive battery terminal and the black test lead to the negative terminal. The multimeter will display the voltage of the battery (photo 7). If you’re testing a 9-volt battery and the display reads less than 9 volts, the battery is weak. If it measures 9 volts or more, you’re all set.
Thrifty tip:If you find yourself with a low voltage battery, keep one around and plug it into something with a lot of gain (like a fuzz) to get that “dying battery” sound.
Testing power
Now, since most people are using power supplies it’s a good habit to also test them for consistency, especially when you’re dealing with pedals of different voltages. A lot of pedals run at 9 volts but that isn’t always the case. Oftentimes you will run into a pedal that typically runs on 12, 18, or even 24 volts, and if you accidentally plug a pedal into the wrong power you could potentially fry some components. A good way to avoid that is to use a multimeter to test your power.
Plug in your power supply and set your multimeter to the DC V setting again but keep in mind some pedals run on AC voltage (old Boss, Digitech, etc.) in which case you set your multimeter to AC V. Take your red test lead and insert into the terminal of the plug, then take your black test lead and touch the shaft of the plug (photo 8).
You should get a consistent reading on your multimeter for the amount of voltage coming out of the power supply (photo 9). If you get spikes or drops in your reading then something is going on with your power and it’s not safe to plug in your pedal(s).
Mapping out a wiring harness
A very common problem among players is grounding issues with their instrument. Having a multimeter and some basic understanding and curiosity about electronics could help you troubleshoot this situation. Set your multimeter to test continuity (photo 1). What you will be doing is testing resistance between two points. If there is very low resistance (less than a few Ωs), the two points are connected electrically, and a tone will be heard. If there is more than a few Ωs of resistance, then the circuit is open, and no sound will come out of the multimeter. This test helps insure that connections are made correctly between two points and also helps detect if two points are connected that should not be. For this example I will be using a Stratocaster wiring harness to demonstrate how to troubleshoot some common problems such as bad connections and grounding issues.
Set your multimeter to test continuity and start by placing one test lead on the volume pot and the other on the tone pot (photo 10).
If you hear a tone emitted from the multimeter then you have a solid connection between the two. Now move your way around the different components while keeping one of the test leads on the volume pot. What you want is for the control pots, switches, pickups, output jack and in some cases the pickguard to all be grounded to one another (photos 11, 12, 13). You can easily run into noise issues if a component is not grounded in the signal. It’s also worth mentioning that you should test to see if your bridge is grounded. Most of the time your guitar strings create a ground from the bridge to the rest of the components but that’s not always the case. A Strat, for example, has a ground wire running from the Tremolo spring mounting claw to ground on the backside of one of the pots. This ensures that every piece of metal that is touching the guitar is grounded in some way. It’s a good thing to be grounded and well connected to this earth – we will never have another one like it!
Another great way to use your multimeter is for mapping out switches when you are wiring up a new guitar or replacing an old switch. For this example I will demonstrate how to map out a 3-way toggle switch that you would typically find in a Gibson-style guitar (photos 14, 15). Start with one test lead on the output of the switch and the other on one of the outside lugs (note: the inside lug on the bottom is ground, if you touch ground then this test won’t work!). Move the toggle to either the right or left position and move the test lead to either lug until you get a tone. When you hear the tone then that means you have a signal going to that position. This will help ensure you don’t accidently wire a guitar backwards and have your neck pickup wired in the bridge position on the switch.
There is plenty more that you can do with a multimeter and they can come in handy even more when you start opening up pedals or amplifiers and want to understand how they are wired up and where the signal is going. I think every guitar or bass player should have one of these in their setup kits as you can really benefit from troubleshooting your own instruments before taking them into a repair shop. You may just be able to find and solve the problem on your own and have a rush of excitement, relief, and feelings of accomplishment, and that’s what this is all about.
Originally published on the Earthquaker Devices blog on June 1, 2020.
You’re stuck at home with more time on your hands than you know what to do with, so you decide to pick up a guitar that you haven’t played in a while. You loved playing it over the years, but it’s lost its luster. Though it may seem like things are changing every day, your opinion of that guitar shouldn’t have to change as well. That lackluster feeling probably just means that it needs to be brought back into alignment. Your guitar should inspire you to keep playing every time you go to grab it. You owe it to that instrument and to yourself.
I would always recommend getting your instrument setup by a professional, but in these times, that may not be an option. Repair shops are closed or only taking in a certain number of clients to maintain a safe and healthy workplace. So, what can you do while stuck at home? Repairing instruments is a skill that takes years of hard work, dedication, and practice. This article won’t turn you into a professional overnight, but I hope to give you a deeper understanding of how to fix some of your instrument’s issues from home.
Like any trade, repairing and setting up instruments is an investment. A combination of experience, skills, and the right tools are needed to get the job done safely and as accurately as possible. The right tools can be a big expense, and if you’re only using them once in a blue moon, they’re probably not worth the investment. If you have the means and are passionate about doing the work on your own, below are several recommendations on tools/supplies you may already have in your home.
Some tools to help you along the way:
Assorted Flat and Phillips head screwdrivers (Stewmac set) and/or Jewelers Screwdrivers
Neck Rest (if not, a small pillow or towel will work)
Yoga Mat (work mat, or old towel/rug)
First, get yourself set up and in a comfortable space with good lighting. If you are able to turn your coffee table or dining room table into a temporary work space I would recommend that. Place your work mat across the top of your workspace to protect your instrument and table. Place all of the tools that you may need to either side of where you’re working. You don’t want to be reaching over your guitar with any tools and risk potentially dropping one on your instrument. If you don’t have a neck rest you can use a small pillow or towel rolled up and place it underneath your headstock where the nut is. Now get comfortable, pour yourself a coffee (or tea), put on some music and let’s get started.
Some steps to a basic setup:
1. Play your instrument. Plug it in and play. Make mental notes of how the instrument sounds and feels. Do either seem odd to you? Keep these notes in the back of your mind while you’re working.
2. Evaluate the Neck and Truss Rod Adjustment. This is perhaps the most important and potentially dangerous step in this whole process, so proceed with caution. I would suggest reading more into truss rod adjustments if you are not familiar (i.e.Guitar Players Repair Guide by Dan Elewine). There are a few ways to evaluate the neck. Many seem to think that you can get an accurate read by just sighting the neck alone, however I would disagree. It’s good to sight the neck, but it’s more of a quick assessment rather than an accurate measurement. To sight the neck, simply hold the guitar so that you’re looking down from the headstock along the top edge of the bass side where the frets end. Turn the guitar around and sight down the treble side. What you’re looking for is an “up-bow”, “back-bow”, humps in the neck (usually where the neck joins the body), and high or loose frets that are usually found on older instruments (see drawing diagrams for examples). I usually evaluate the neck with a straightedge and feeler gauges, which give an accurate measurement (however, straight edges are not cheap, come in several sizes, and take practice in getting accurate measurements). For the sake of this article, we will skip to an easier (and free) solution – making your own straightedge. With your guitar in the upright playing position, place your right hand thumb on the low E string directly on the fret where the neck joins the body (typically frets 15, 17, or 19) and your left hand index finger on fret 1. What you have created here is a straightedge. Now, stretch your right hand index finger out and tap around frets 5-7 (however far you can stretch), making sure that there is some space under the string. A good guideline would be to put a business card between the fret and the string as you keep pressure on the fret. If a business card fits snug, then you’re in the general ballpark. If there is too much of a space, this means there is too much relief in the neck and the truss rod needs to be tightened. Too little space means the neck is too straight and the frets are touching the strings allowing for frets to buzz. We don’t want that. If this is the case, you’ll need to loosen the truss rod some. It’s very important to always loosen the truss rod before you tighten it and use extreme caution. Avoid sudden movements and don’t use too much force. If you start to feel the truss rod cease up, STOP! Forcing a truss rod to tighten will cause the rod to snap and there is no going back from that. If you find yourself in this scenario simply back off a bit and leave it be. Further steps require deeper knowledge and you don’t want to snap your truss rod, trust me. There are several different wrenches used for adjusting truss rods and if you bought your guitar new than it most likely came with the appropriate wrench size. Never adjust a truss rod with the wrong size wrench, it will end badly.
3. Adjust Bridge/Saddle Height. After getting the neck to the right measurement, you’ll need to get the string height at the bridge in the right place using the string action ruler (from StewMac) to adjust the bridge and saddles to the correct measurements. I base my measurements off the string action gauge holding down the string at the first fret and adjusting each saddle to .060” measuring at the 12th fret. This puts all of your strings automatically to the corresponding radius of your guitar, so you don’t need to measure with any radius gauges. With your neck set to the proper relief and your bridge and saddles at the correct height, play your guitar and listen for any buzzing sounds. If you don’t hear anything, you’re in the clear, but if you do, then further adjustments need to be made.
4. Check the Nut. Normally here is where I would adjust the nut height and file any slots if needed. However, this takes a lot of practice and skill to do so effectively, and the tools to get the job done properly are not cheap. You’ll need nut slotting files of various gauges and they take a bit of practice to get used to. It’s good to measure how high or low your slots are but for the sake of this article and the simple fact that most people don’t have these tools, we will move onto the next step assuming the nut is where it needs to be. How you can measure the nut is similar to how we check for relief in the neck. Simply put your left hand index finger on the first fret and your right hand index finger on third fret and tap repeatedly. If there is a lot of space, your fret is too high. If there is little to no movement, your slot is too low, allowing for the string to touch the frets which will cause some buzzing when the string is played open. Further skills would be required if your nut is not where it needs to be. I plan to go into further detail about this and truss rod adjustments in another article, but for now we can move on.
5. Check electronics. While the instrument is plugged in it’s a good time to check the electronics to make sure everything is behaving properly. Gently wiggle the guitar cable at the output jack to see if anything cuts out. Turn the volume and tone pots up and down and listen for any scratching. Move any selector switches back and forth and listen for any cracks or pops. If everything is silent, you’re in the clear. If not, make notes of what’s happening and address the situation when the strings are off the guitar.
6. Remove Strings, Tape off Pickups, Polish Frets, and Oil the Fretboard. Next, remove those old strings, clean the guitar and tape off the pickups covering the pole pieces with painters tape. This will protect the pickups from getting damaged with steel wool debris. If you don’t have fret guards (see photo no.1), no sweat. You can take blue painters tape and tape off the fretboard as shown (see photo no. 2). This will protect any scratching of the fretboard from the steel wool. Next, grab a small amount of steel wool (half the size of a penny) and roll it around until it forms a ball. Take the ball of steel wool and rub it back and forth over each fret and watch as the dirt and grime falls away until you see shiny new frets again. After each fret is polished, carefully vacuum up any remaining steel wool left on the guitar with a vacuum cleaner using a brush nozzle if you have one. Be sure to also get around the neck pickup pole pieces and neck joint as a lot of wool can collect there. After all of the steel wool is removed, remove any tape from the fretboard and lightly oil the fretboard with lemon oil on a shop towel and work it into the fretboard. No need to go overboard – a little goes a long way. This gets the fretboard wood back to looking healthy and playing smooth. If you have a maple fretboard, skip this step as it’s not good to use lemon oil on maple fretboards – dark fretboards only. (Tip: never use the same towel that you used to polish your guitar. Keep lemon oil and polish separate).
7. Clean and fix any electronic issues. While the fretboard is moisturizing, now is a good time to check any electronic issues that you may have come across. If a jack is loose, tighten it with the correct nut driver. If you heard scratchy pots, use just a few drops of contact cleaner into the open cavity and turn the pots as it’s going in. This will allow the cleaner to move around and get rid of any dirt and debris on the inside. Fixing electronics is a whole other discussion and can get very in-depth, as there are many issues guitar electronics can face. Assuming everything is working, we will tackle fixing electronics and common troubleshooting another time.
8. Restring. Now that you have checked the electronics and cleaned the fretboard it’s time to restring your guitar. There are many different ways and everyone has their methods but instead of going through every one I will just show you what I do on a couple of different styles of tuning machines. I always make sure there are several winds around the tuning post. You don’t really need any more than that and if you have less you can risk the string not staying in tune, and potentially snap. With string-thru style tuners I make sure that the string is sandwiched between one wind on top and two winds on the bottom. This secures the string properly in place. With top loaded Fender-style tuners I start with stringing the guitar through the bridge, making sure it’s all the way taught, bringing it up past the string posts. I measure about 3 posts beyond the one I am striging and cut. This will allow for roughly 3 winds.
9. Lubricate the Nut And Saddles. Lubricating the nut and saddles will help keep your guitar in tune and stable. There are many different products designed to do just that (i.e. Big Bends Nut Sauce), but I have learned that using lead from a no.2 pencil does the job just right and most people will have a pencil lying around their house. Make sure it’s extra sharp and draw a few even lines in each slot and on the grooves of the saddles. This allows the string to vibrate freely without getting snagged on any loose particles in the nut slots or saddles, and is especially helpful with guitars that have tremolos. It’s good to loosen the strings some to allow yourself to work on the nut and saddles.
10. Adjust the height of the pickups. After you tune the guitar back to pitch, it’s time to dial in your pickups. I could go further in depth as to what the correct measurements should be, but simply put, use your ears. I start off by measuring all the pickups with my right hand index finger on the bass and treble sides while holding down all of the strings with my left hand, getting them all to an even position adjusting from there to my ears liking. A general rule is that the closer the pickup is to the string, the louder it will sound. If you’re going for something more dynamic, adjust the pickup further into the body. I tend to like my pickups closer to the string at the bass side and further away at the treble side. (Tip: Remember that the pickups are magnets so be careful not to hit the pole pieces with your screwdriver; you could potentially damage the pickup.)
11. Intonation. There is often a lot of confusion when it comes to intonation, but it’s really more simple than people may realize. Intonation is making sure that the instrument is in tune at the 12th fret octave to its designated open string. Many guitar bridges/saddles are different – some have individual saddles allowing for each string to intonate and some strings share saddles (i.e. vintage Telecasters) and are oftentimes not compensated. First, plug into a strobe tuner. (There is an app by Peterson for your phone, or a regular tuner will do just fine). Turn your tone knobs down all the way for a more accurate reading and tune your guitar. Start with the lowest string and fret the octave at the 12th fret. The note should be the same, but chances are it will either be sharp or flat. If it’s too sharp, simply tighten the adjustment screw a few times (bringing the saddle closer to the back of the bridge), re-tune the open string, and check the 12th fret again. If it’s too flat, simply loosen the adjustment screw a few turns (bringing the saddle further away from the bridge), re-tune, and check the 12th fret again and repeat. If it’s hard making the adjustment, simply detune the string so it’s loose and lift the string off of its saddle and then make the proper adjustments. The tension often makes it difficult for the adjustment screw to turn, which may cause you to strip out a screw. (Note: It’s good to check the height of all the saddles again after making your intonation adjustments as sometimes the height of each saddle will move depending on how much you adjusted the intonation screws.)
12. Play your instrument. Now play your instrument again. How does it feel? How does it sound? Wait…it sounds off? You probably left your tone knobs all the way down when you were adjusting the intonation, so turn those up and now let’s hear your instrument again. Does it play differently? If all went according to plan you should notice a difference in the playability and tone of your instrument. If something still feels off, go through each of these steps again and check all the measurements. Sometimes truss rods move even a few minutes after adjustment and if you’re not making exact measurements with a straightedge and feeler gauges it’s tough to know exactly where it is. Your eyes can also play tricks on you so it’s always good to double check your work.
Every instrument has its own identity, and with that its own set of issues. In the end, they all can play and sound better with a little bit of time, care, and patience. At the very least, I hope you now have a deeper understanding of what exactly goes into a basic setup. You may not have good luck with doing this on your own, and that’s okay. Like everything else, it takes patience and practice. If you still have trouble getting your instrument to play right, there are many professionals out there to give your instrument the care and maintenance that it needs to perform. Support those people if you can, now more than ever.
Back in April of 2019 I started working with Jesse Tobias (guitar player for Morrissey). In preparations for an upcoming tour he wanted to update his current board as it was a mess of mismatched power cables, gross old velcro, and busted pedals. I was eagerd to get my hands on this and get his situation up to what I consider to be normal. I had just over a week to get this ready in time for an upcoming tour with Morrissey. So with the help of my colleague and mentor Erik Bailey (@unfirommusicla) I was able to get it done at his shop just in time.
My first mission was to dismantle this smorgishboard and clean all of the pedals, replace switches, jacks, power, etc. To my surprise I did not find any creatures roaming around inside these pedals, however inside the Ibanez Delay there was an impressive amount of dirt, dust, and grime with compelling evidence of maybe a spider living in recluse at some time or another.
Here lies Jesse’s original pedalboard…
The next steps after cleaning and testing every pedal was to sort out a better power solution. I chose three options, all from Strymon because they are lightweight, durable, and have options for 12, and 18volts. Best of all they automatically convert power overseas so if you forget to plug into a power transformer it doesn’t freaking matter! The strymons are a go to power supply for every build over at Uniform Music. In order to power twenty pedals I needed to get four power supplies (1 zuma, 2 Ojai, and 1 Ojai R30) all chained together. Strymon allows for you to chain as many Ojai units off of the Zuma as you need, which is very useful when powering a board of 20 pedals or more.
The next stage was figuring out a signal flow that worked best for Jesse. I made notes of what was already going on and worked out a solution from that template. The two Flip pedals (Orange Tremolo and Blue Tube Echo) were patched at the very end of the signal but colored a lot of the tone more than anything else in the chain. Erik had the idea to put both in a separate loop to help clean up the signal some and it made a great deal of difference. The only issue I ran into once it came time for rehearsals was making sure Jesse remembered to turn it on, eventually it always ended up staying on but it’s a good function to have for him when he’s in the studio.
Yada, yada, yada, I put velcro down, made a lot of cables, routed power separately from the audio and what you have is what you see in the photo at the top of this blog post. At the end of the week I was very happy with how everything turned out. Jesse has about every type of effect and pedal imaginable on this board, allowing for a lot of options. Its cool seeing how he stacks a lot of these pedals live to capture his unique sound. Some favorites from the pedalboard are the Flip Tube Echo and the Ibanez Delay.
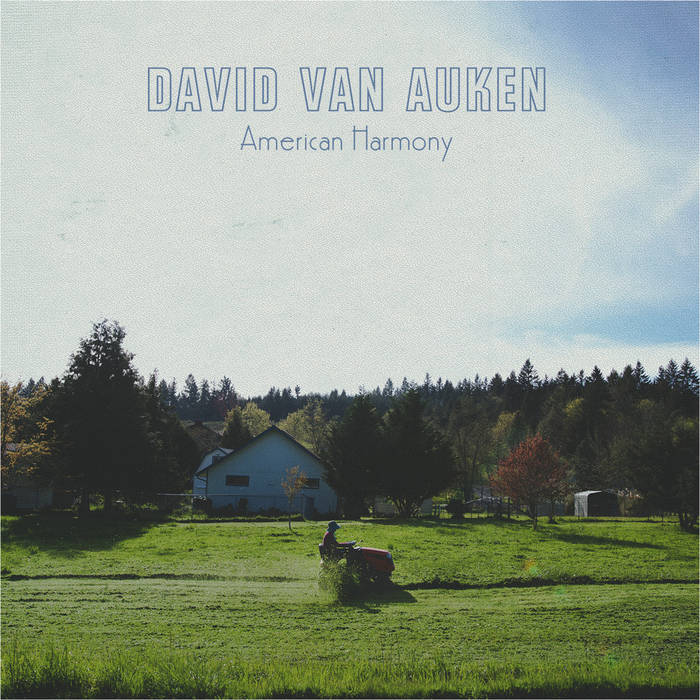


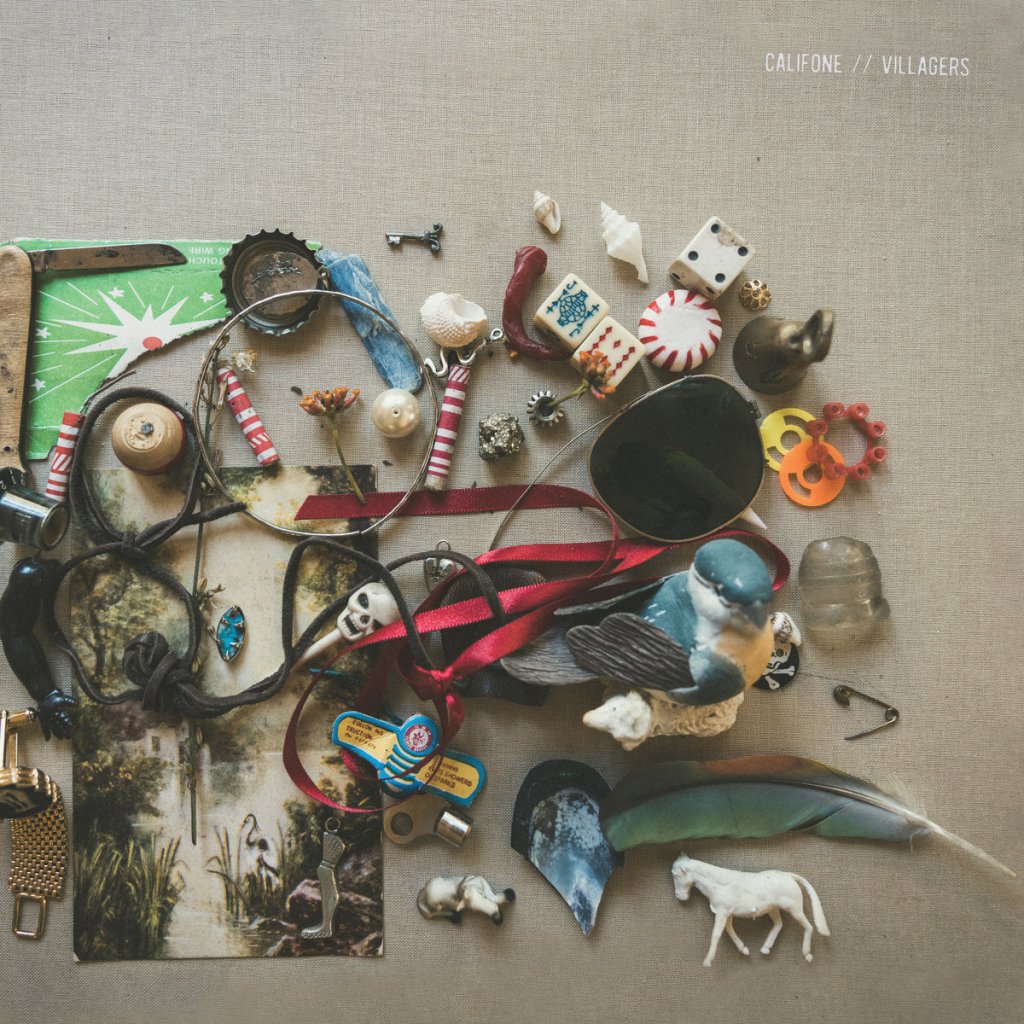


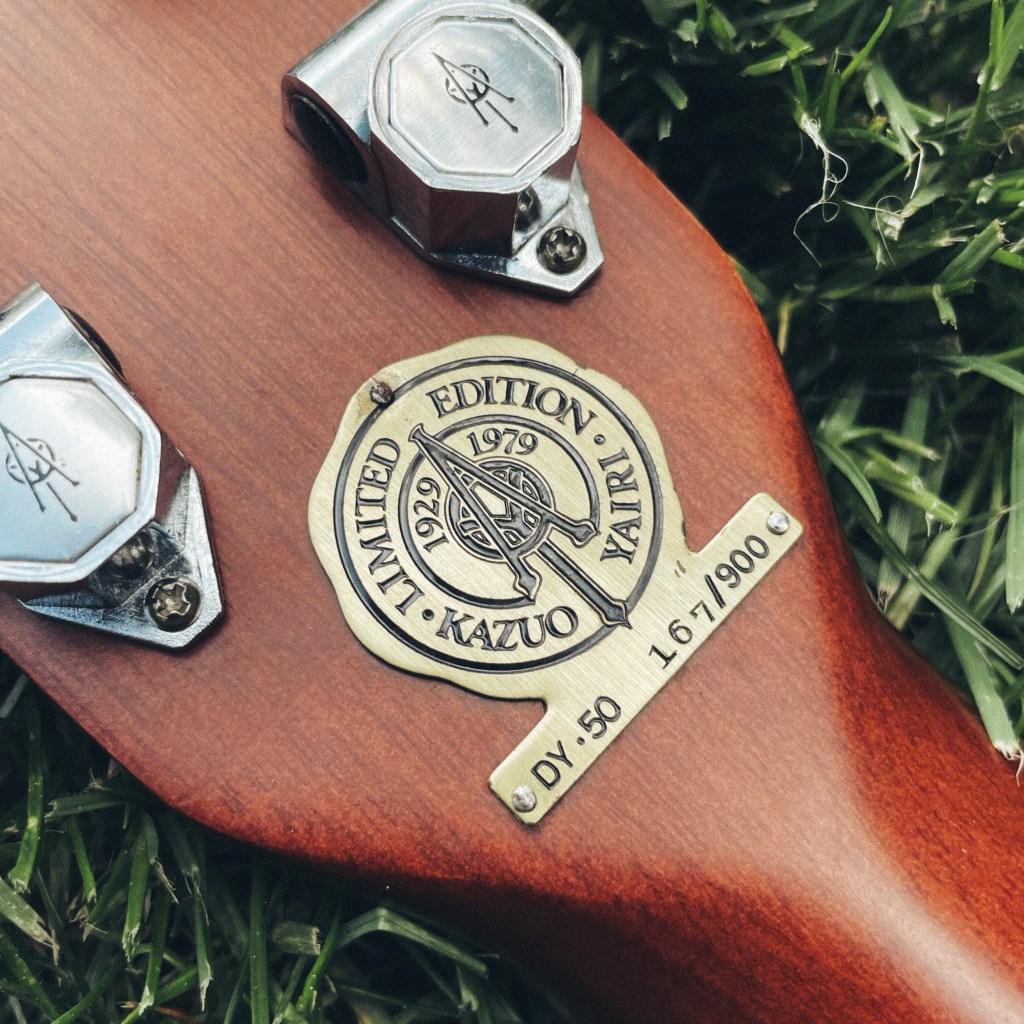
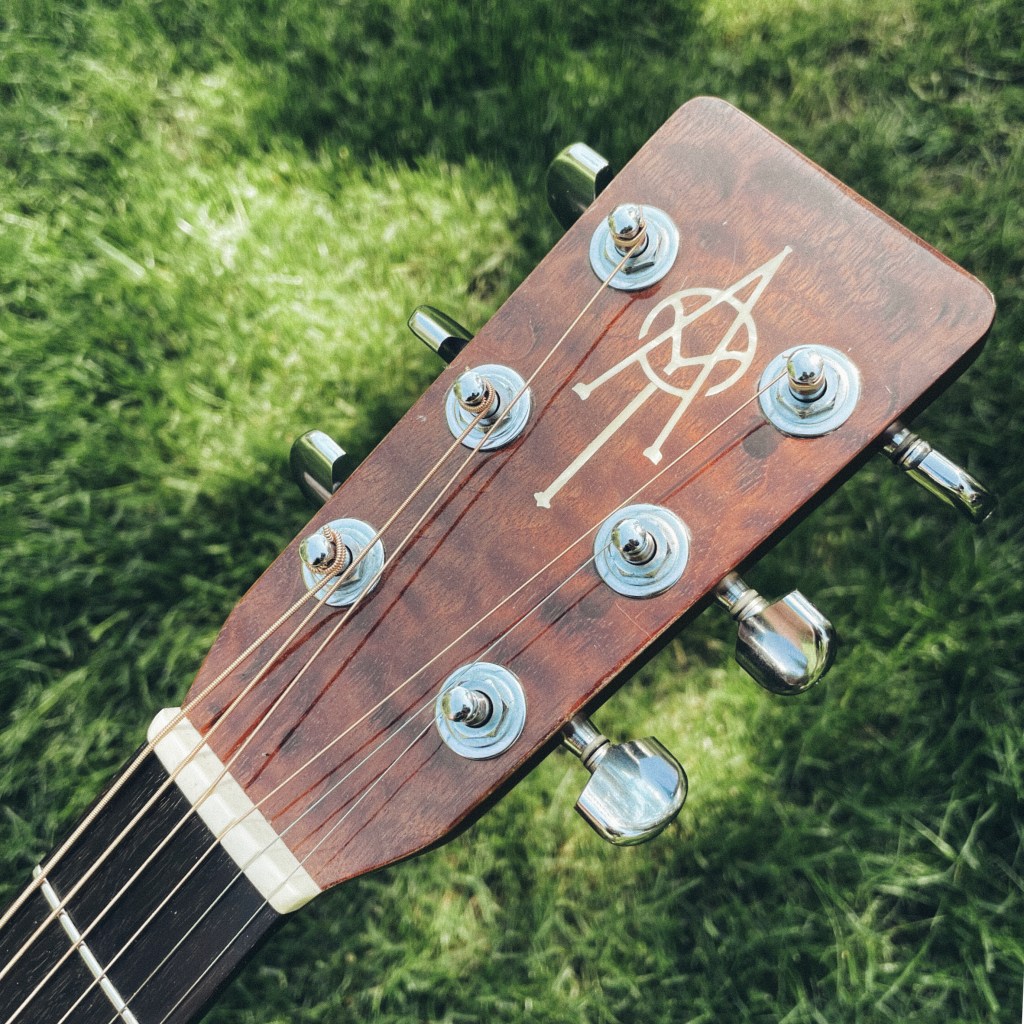

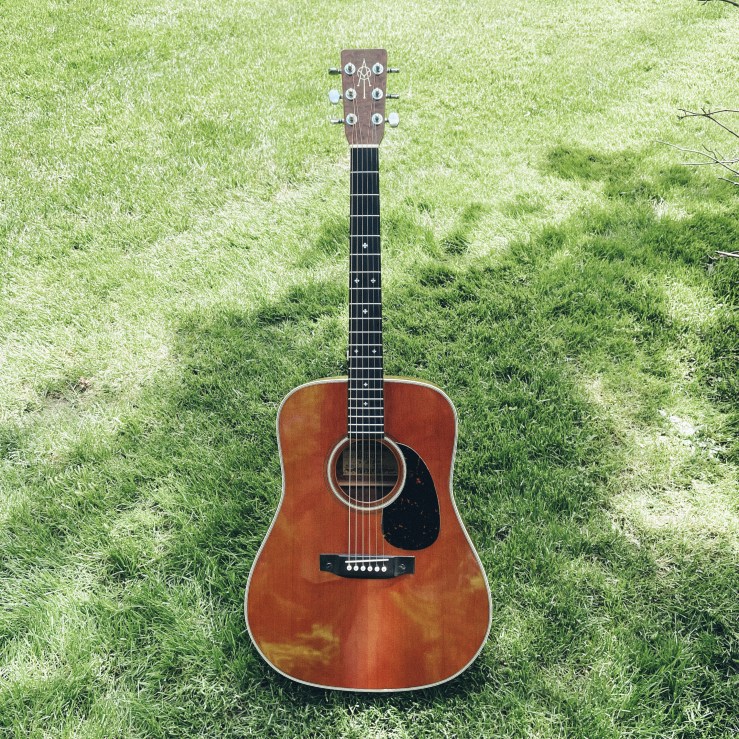

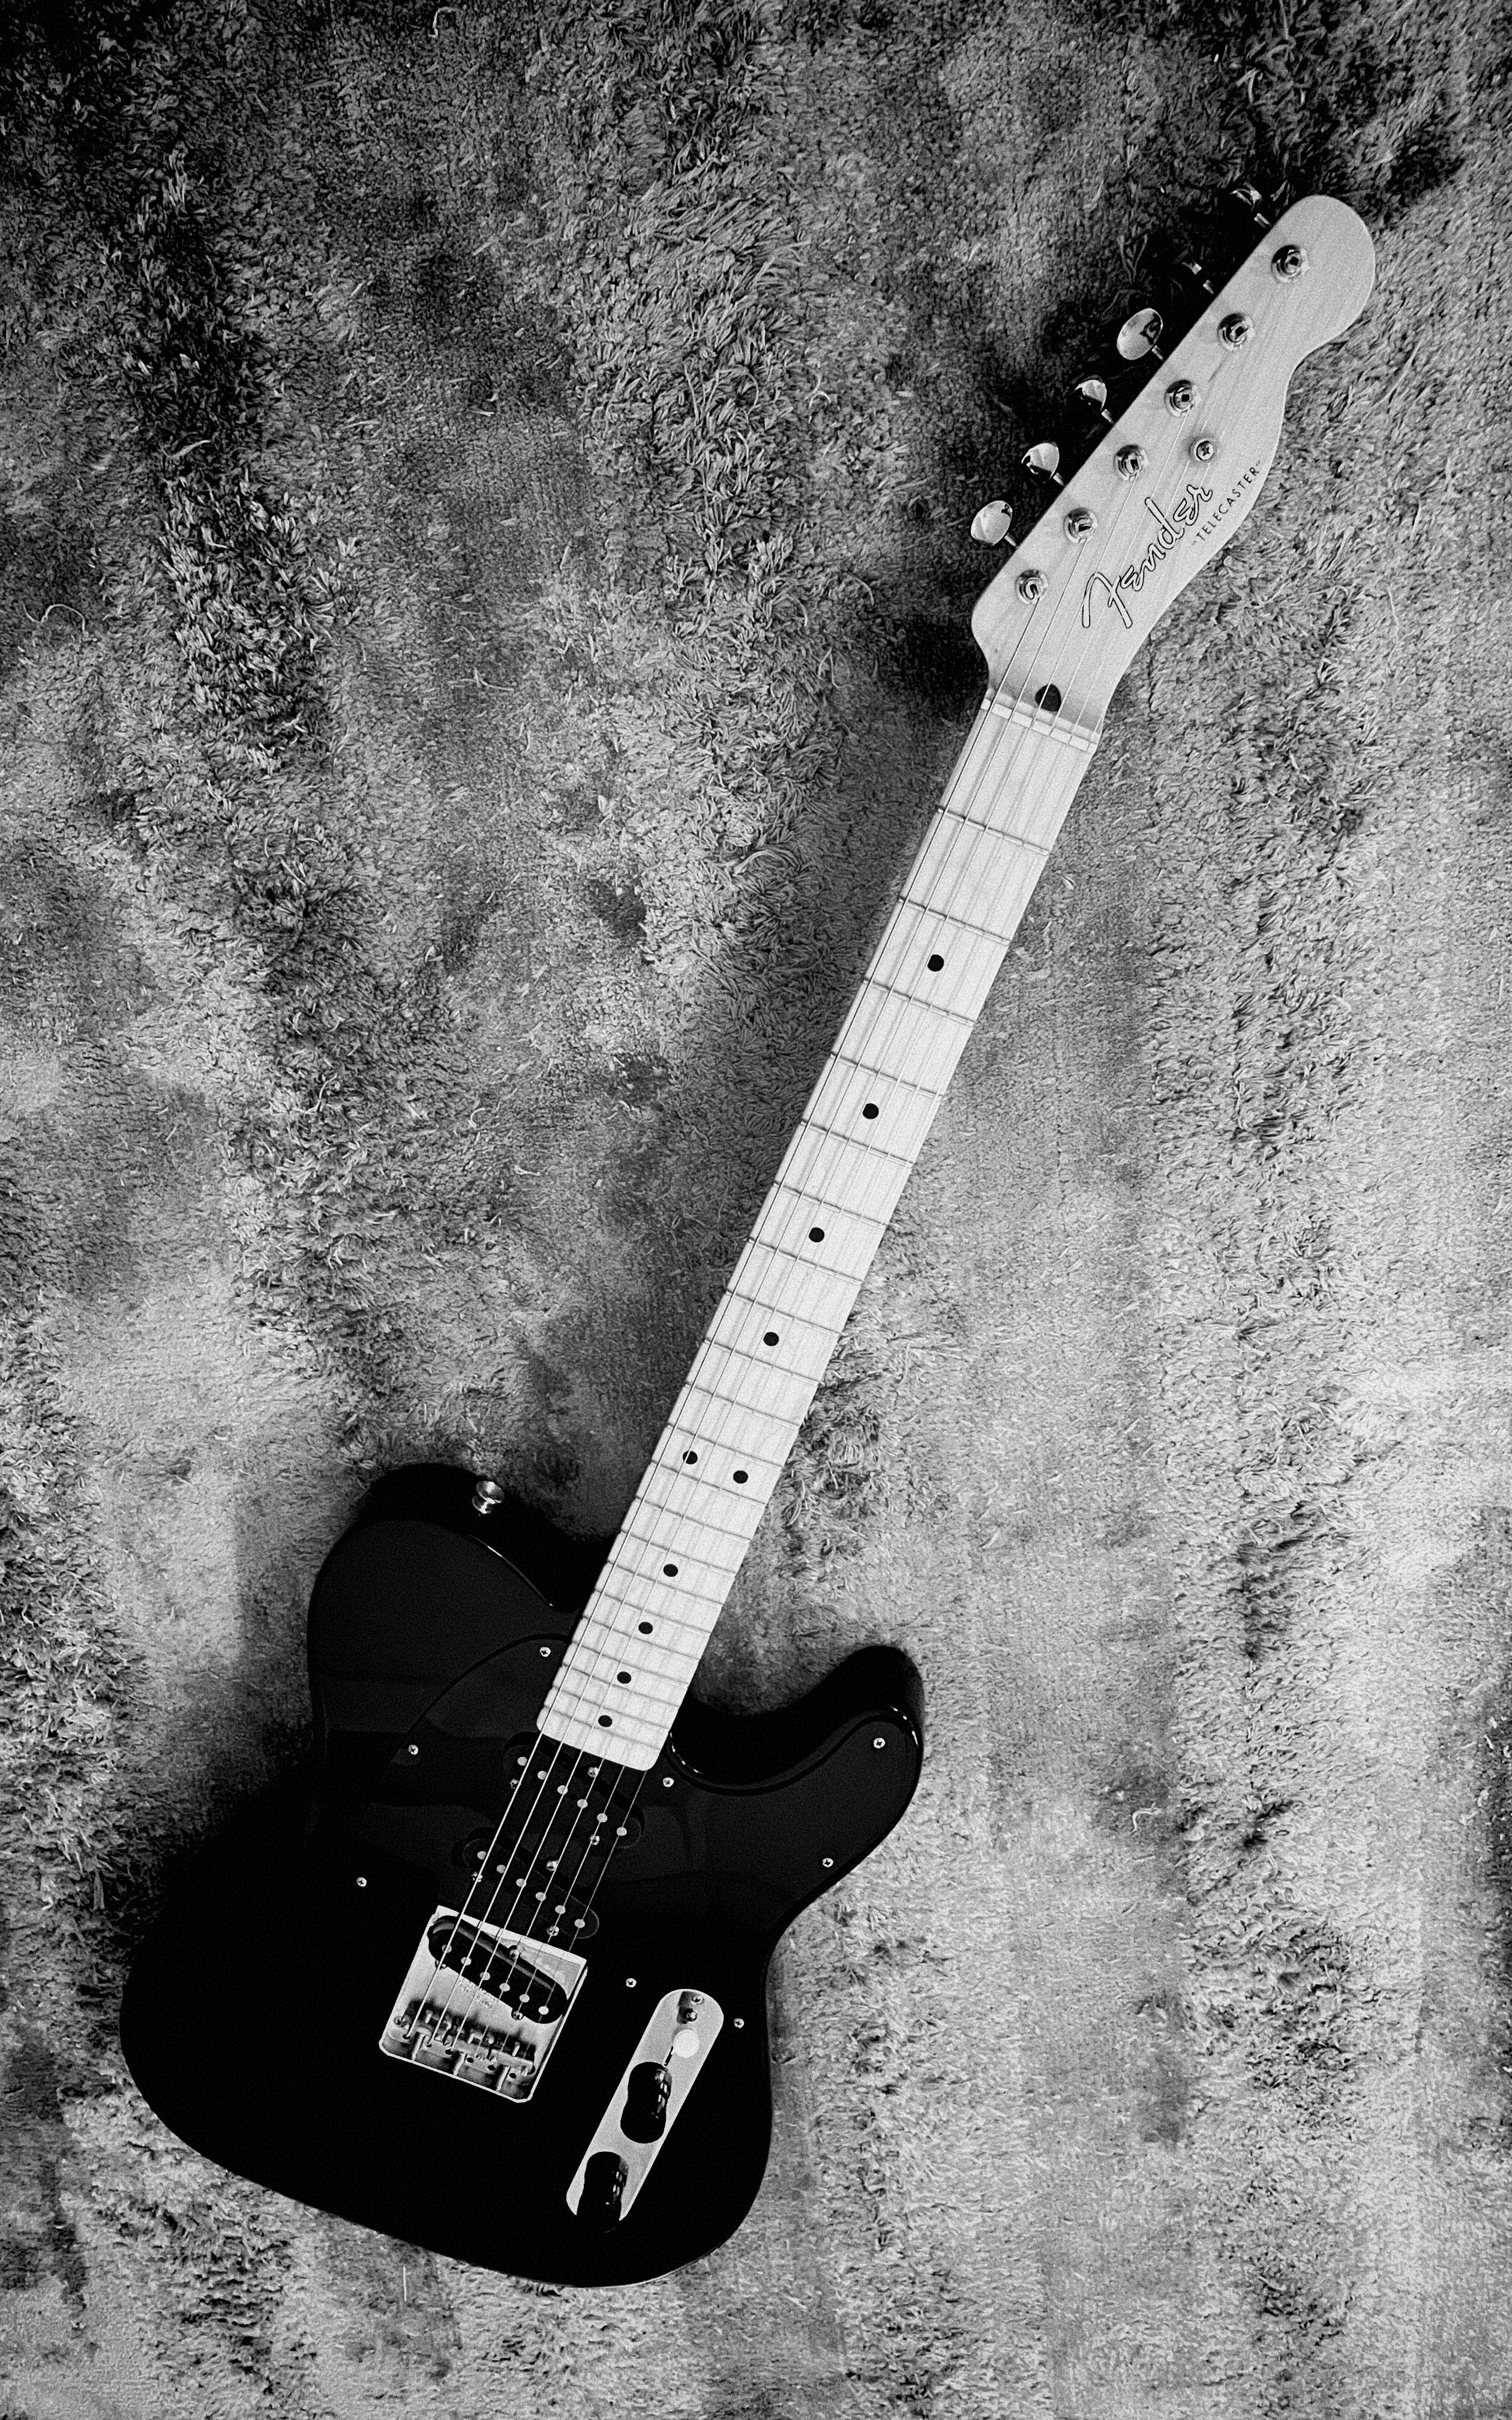
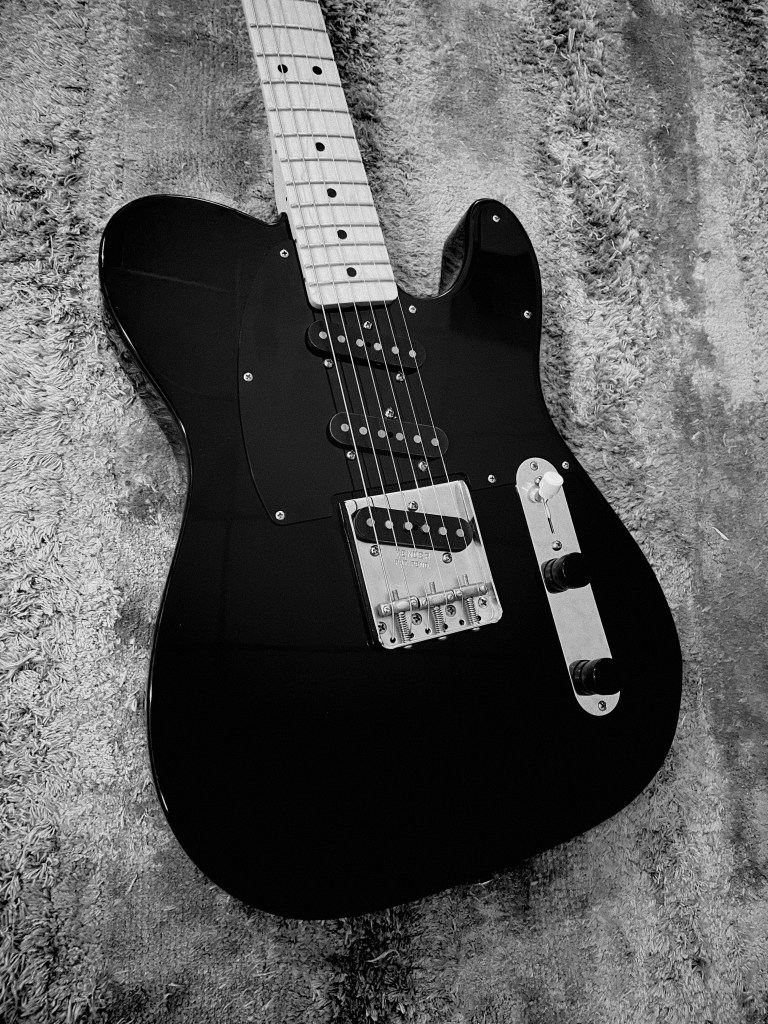

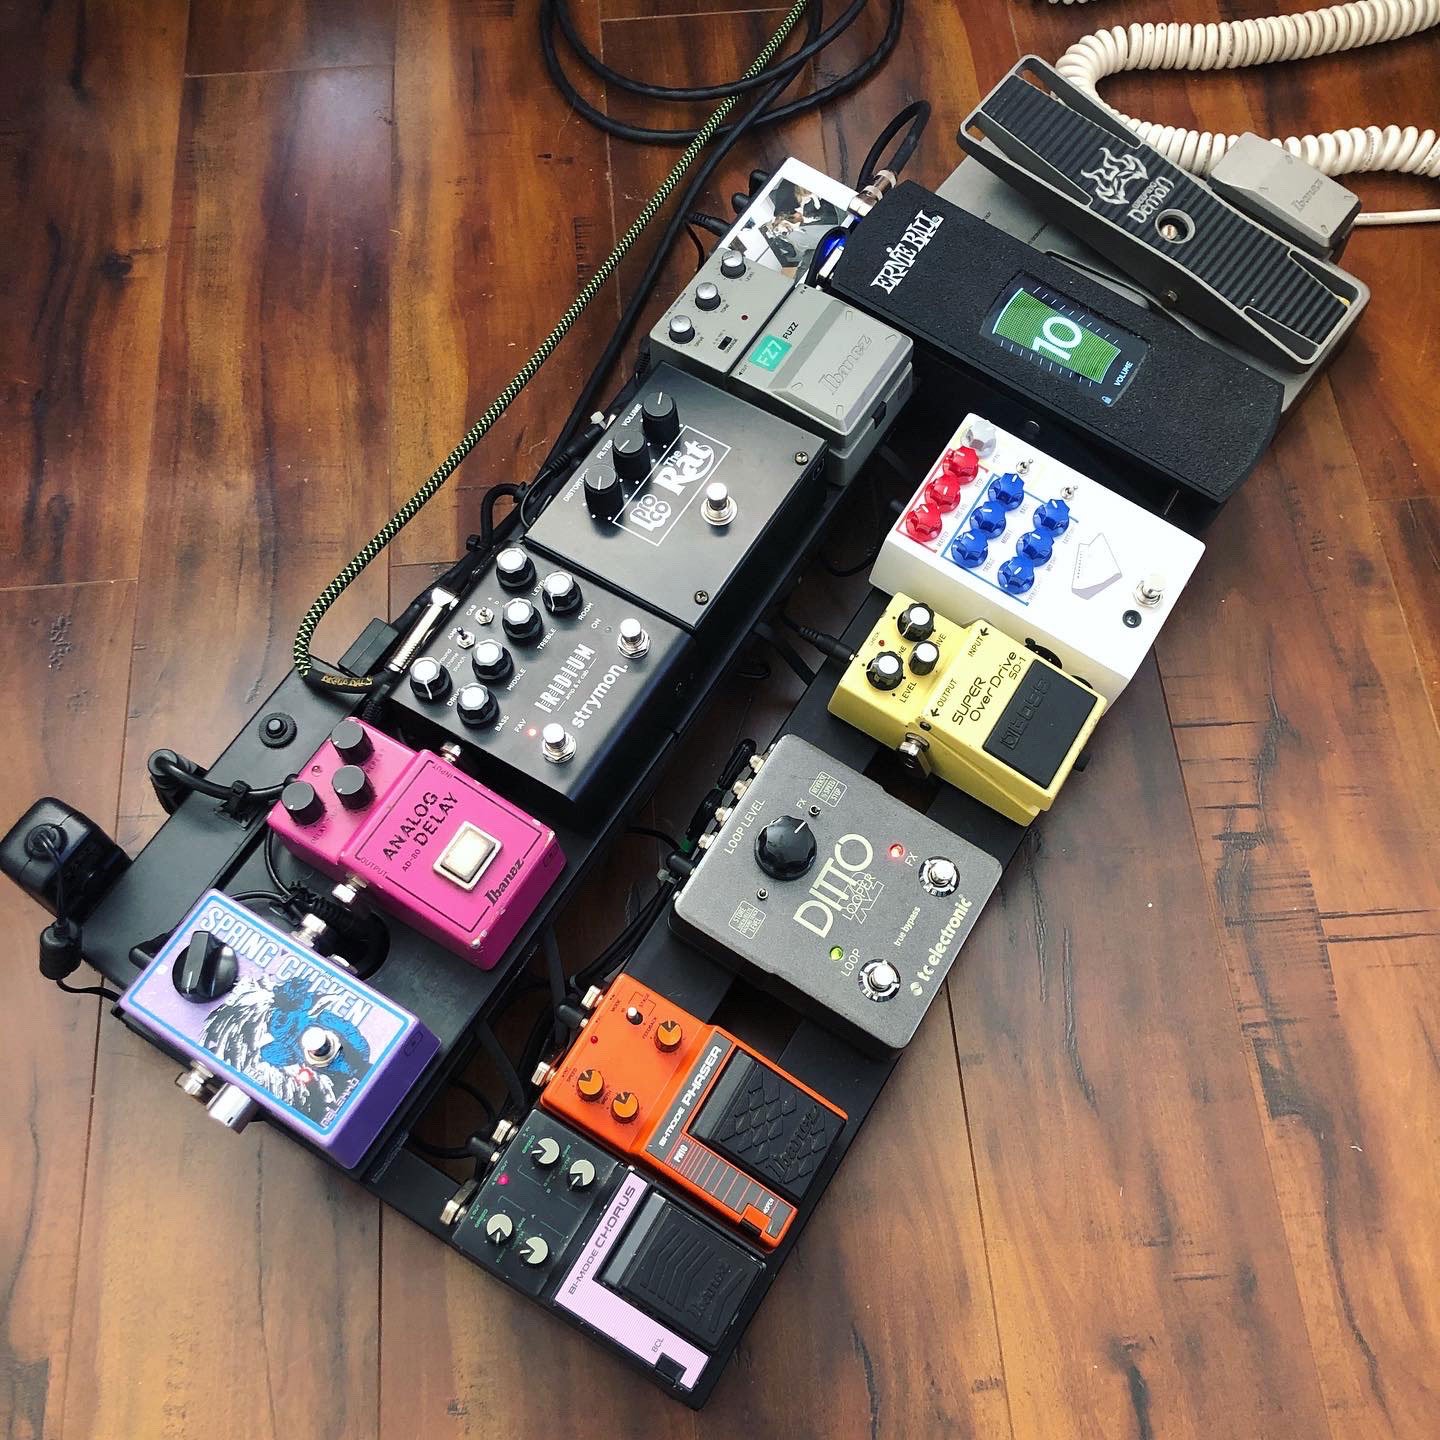

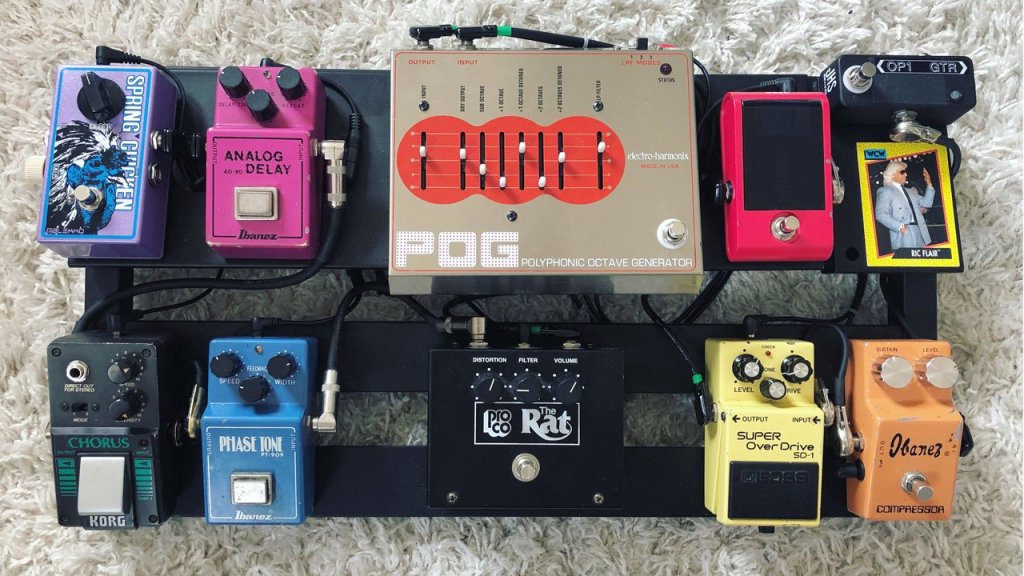
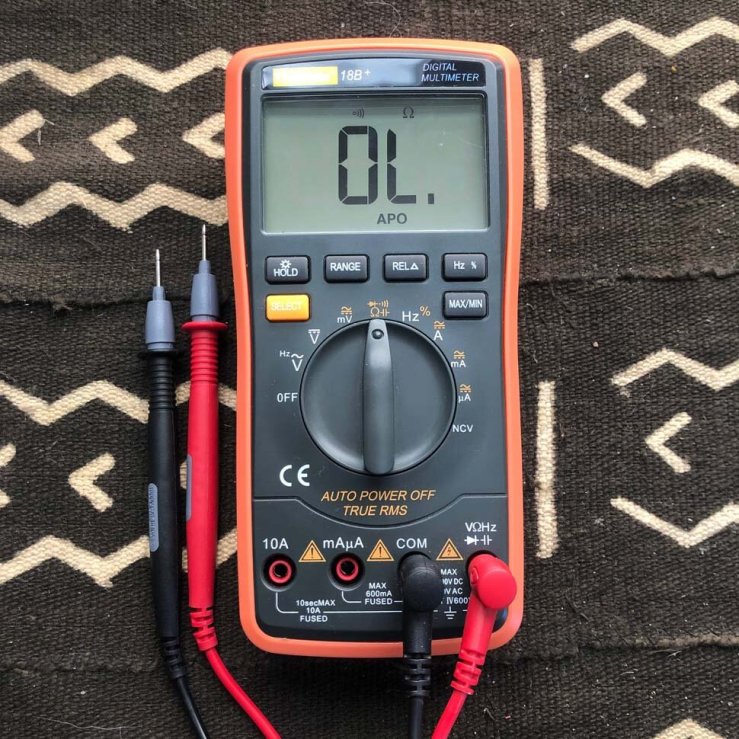
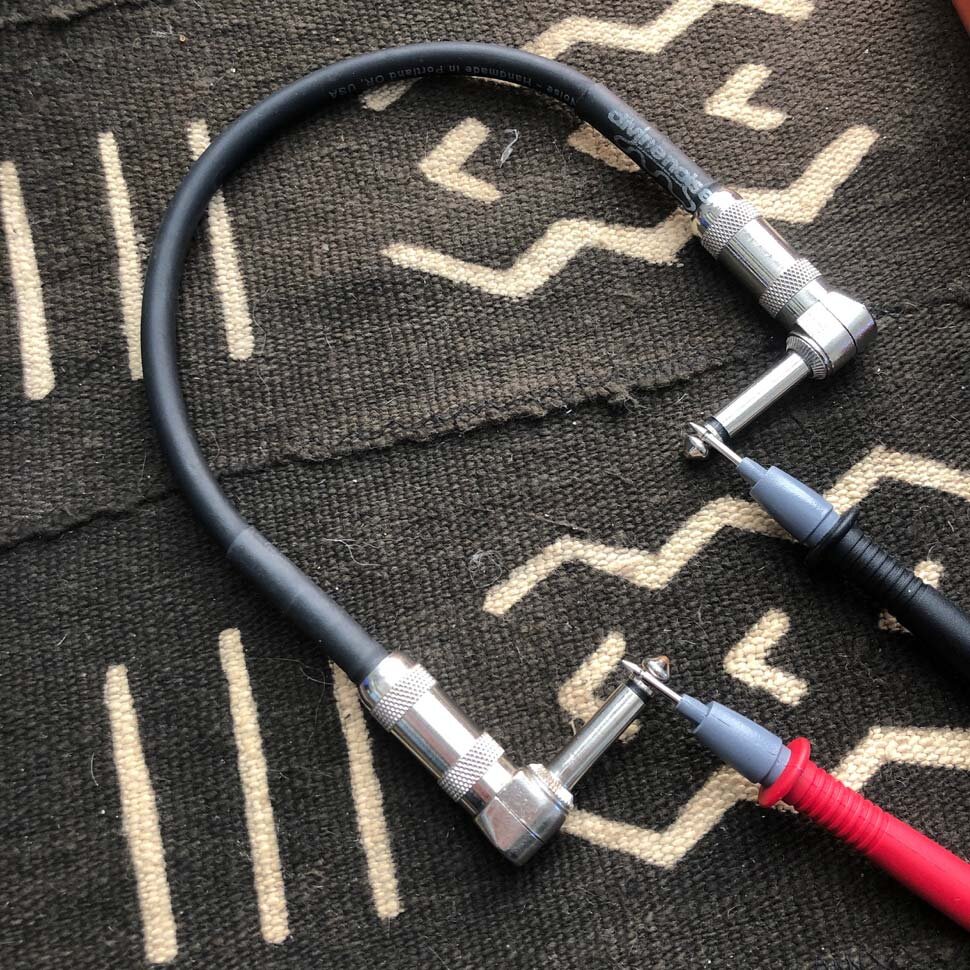
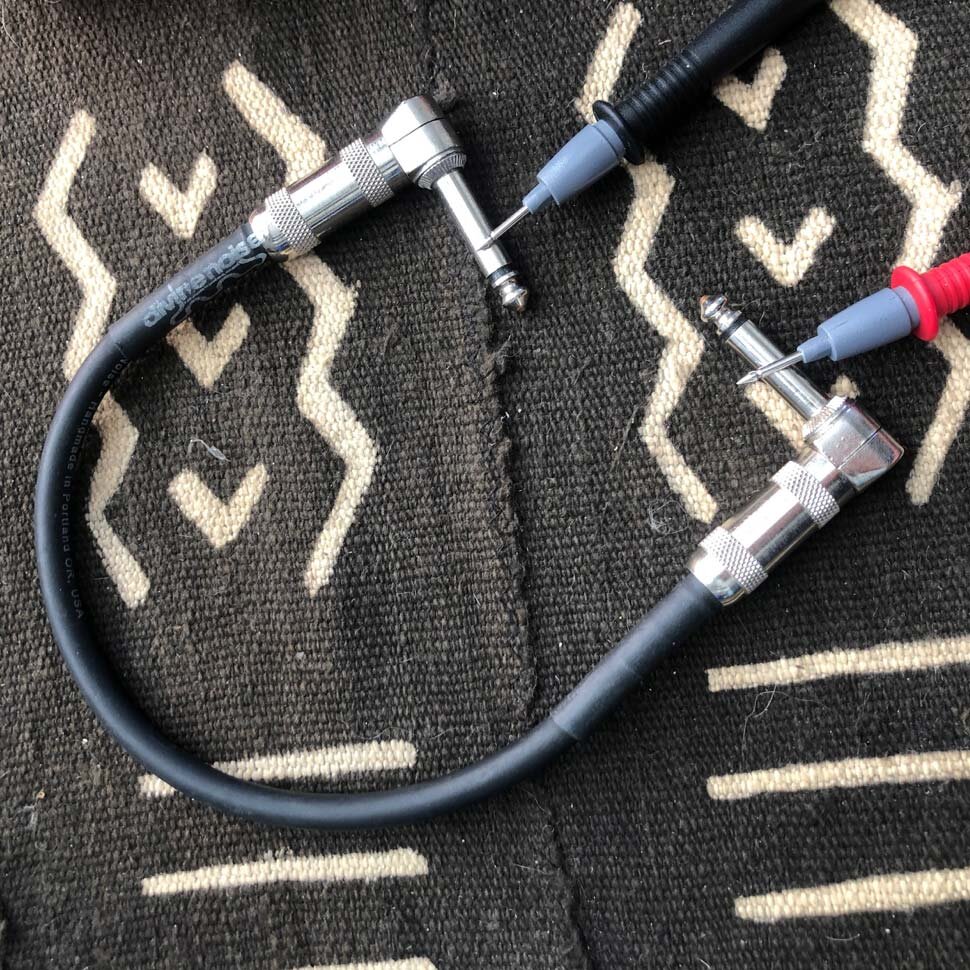

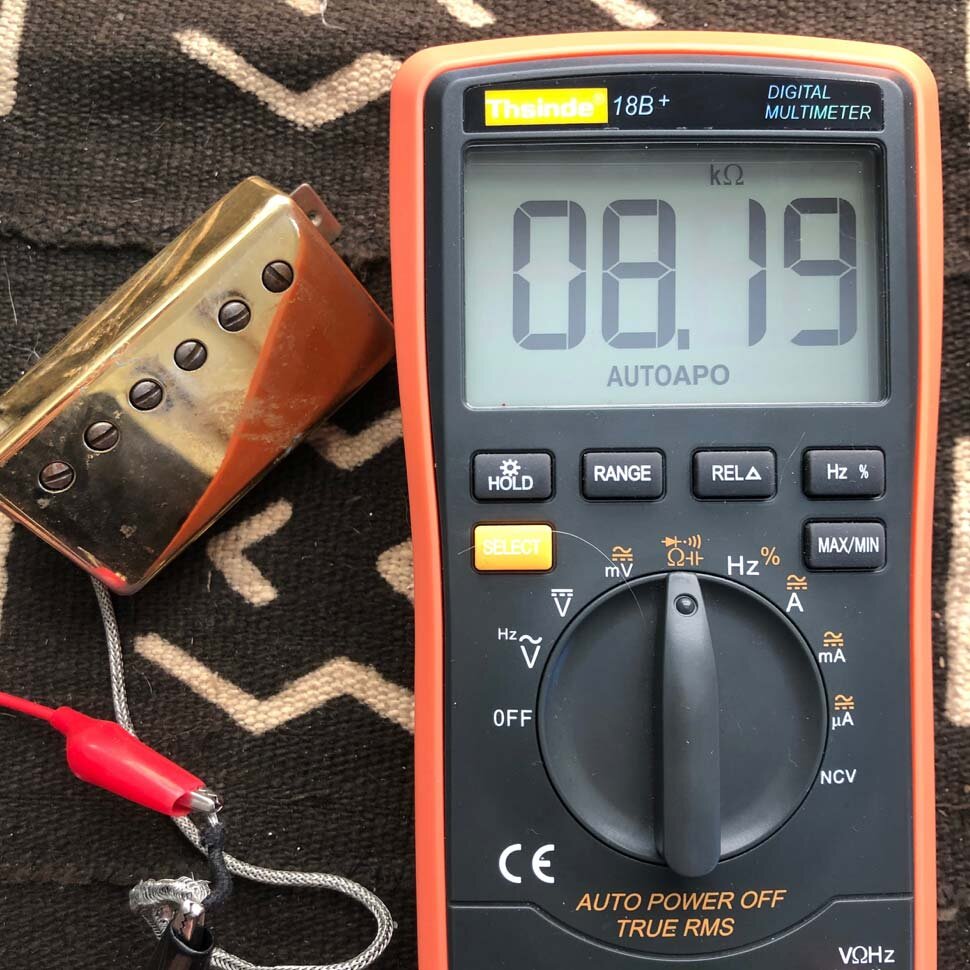
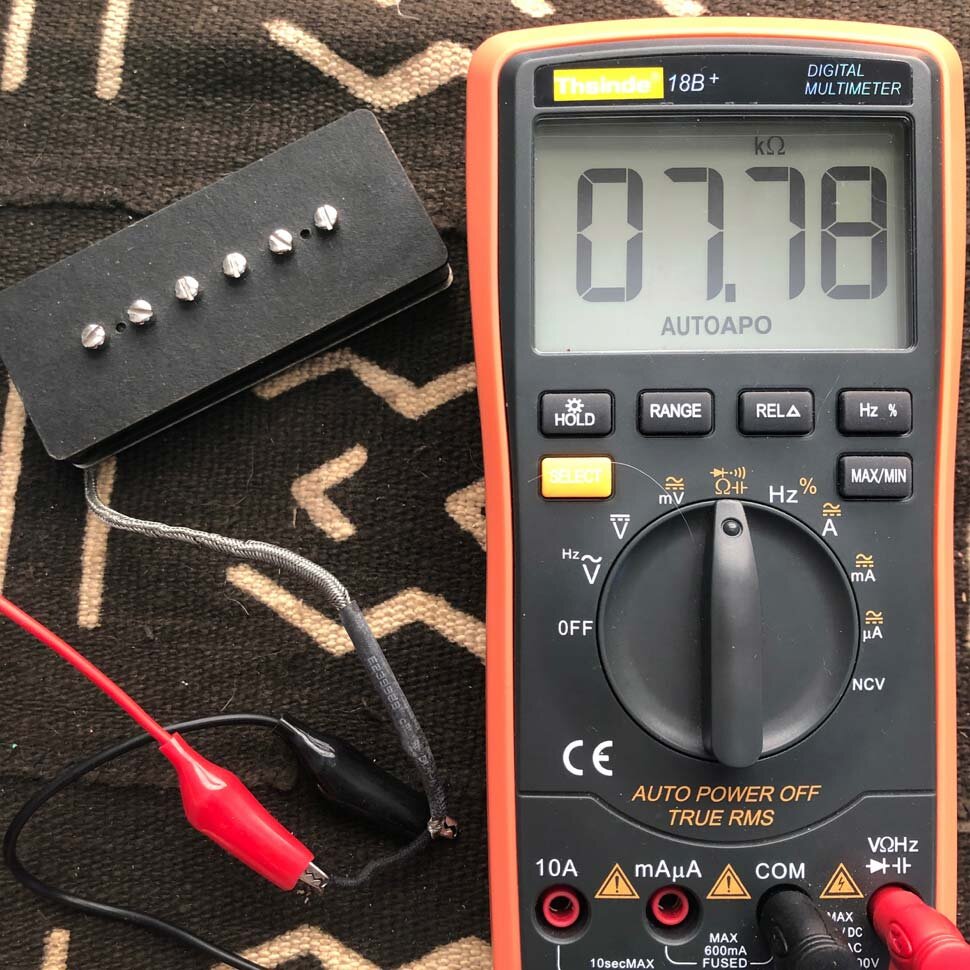
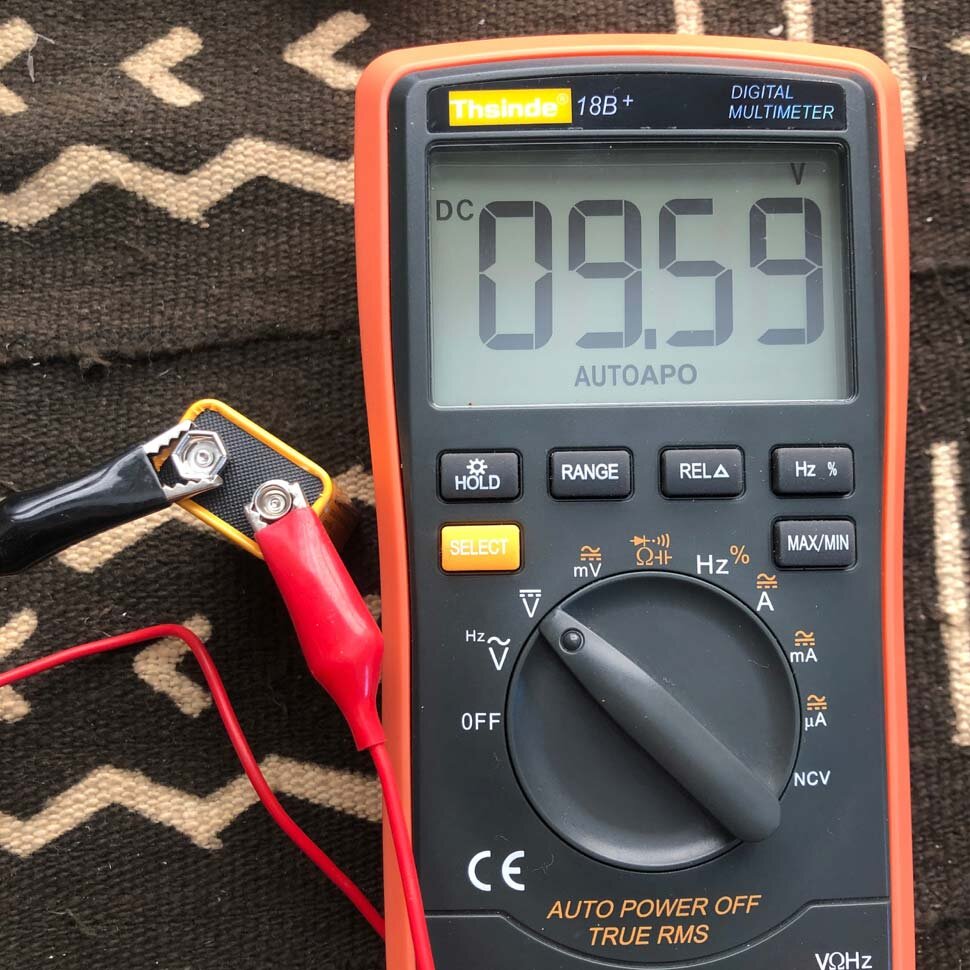
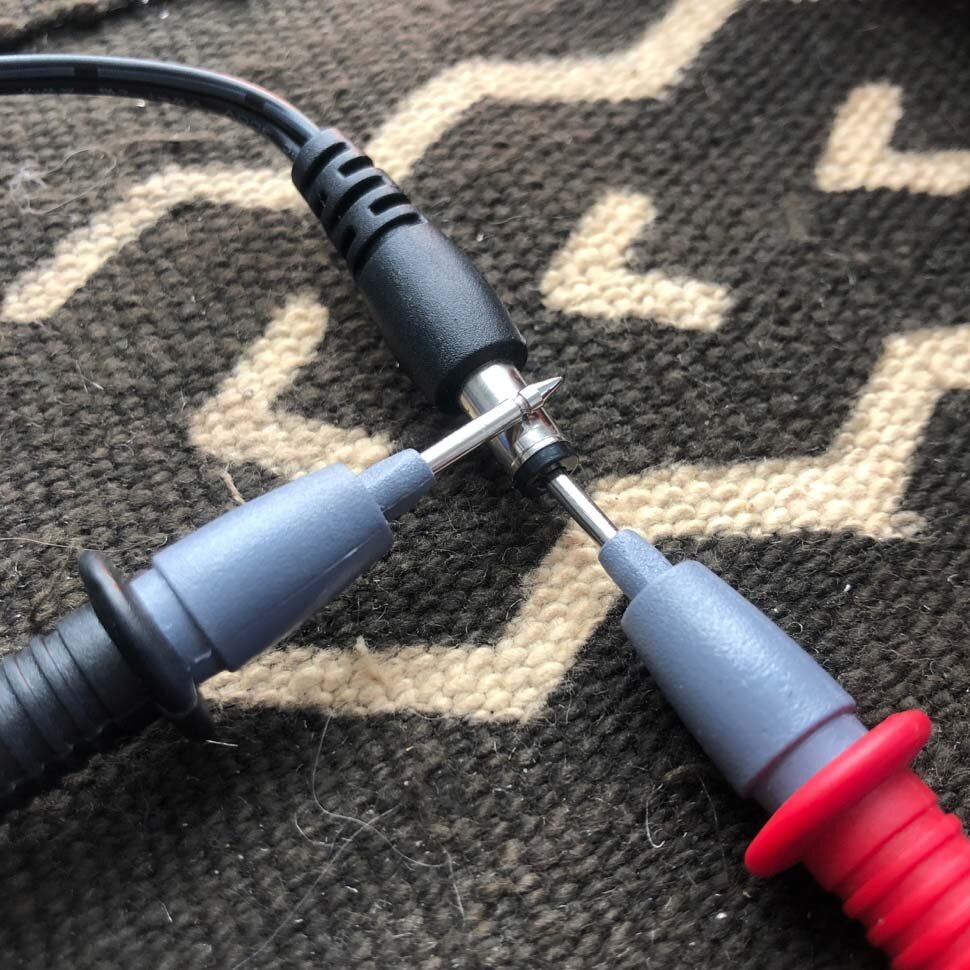

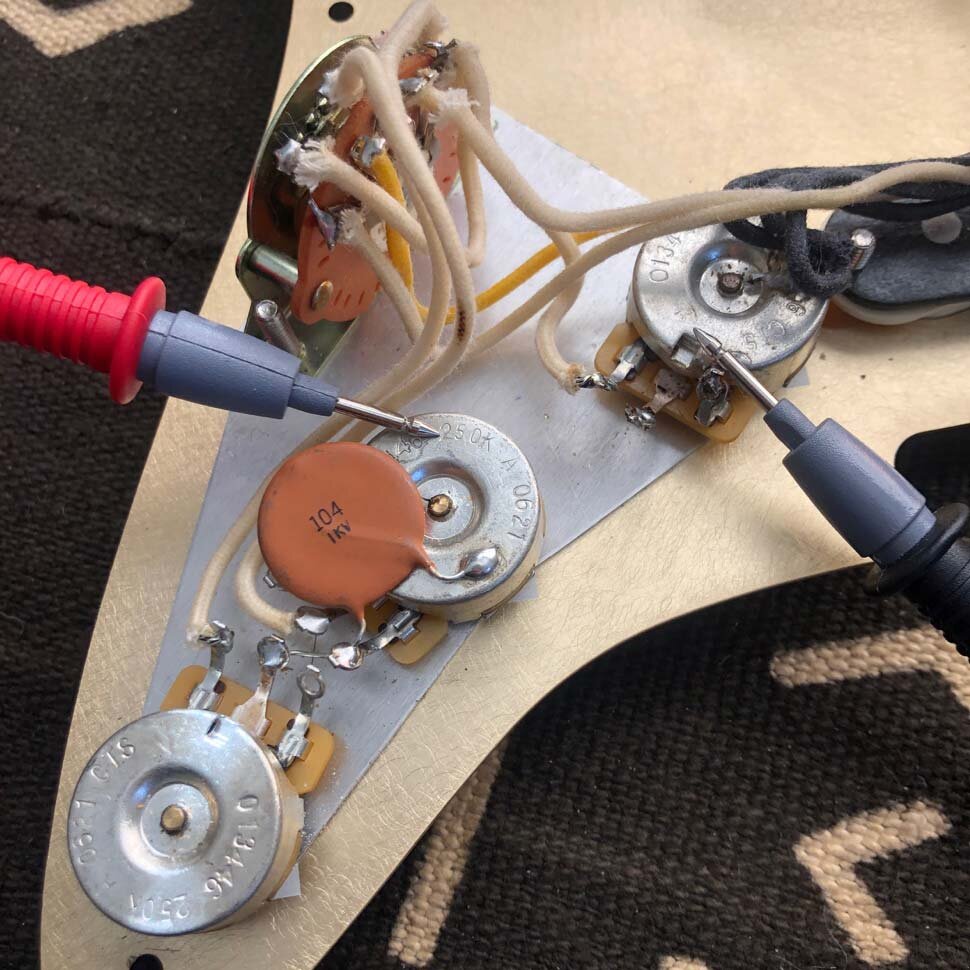


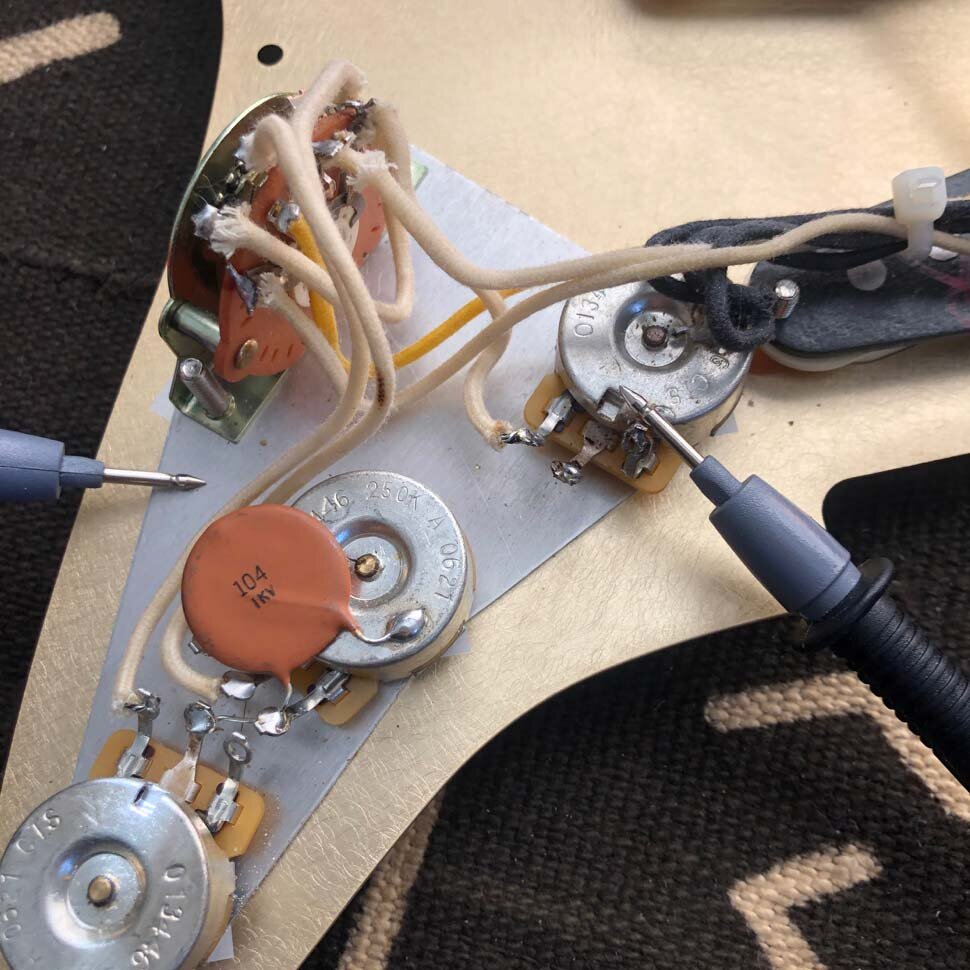

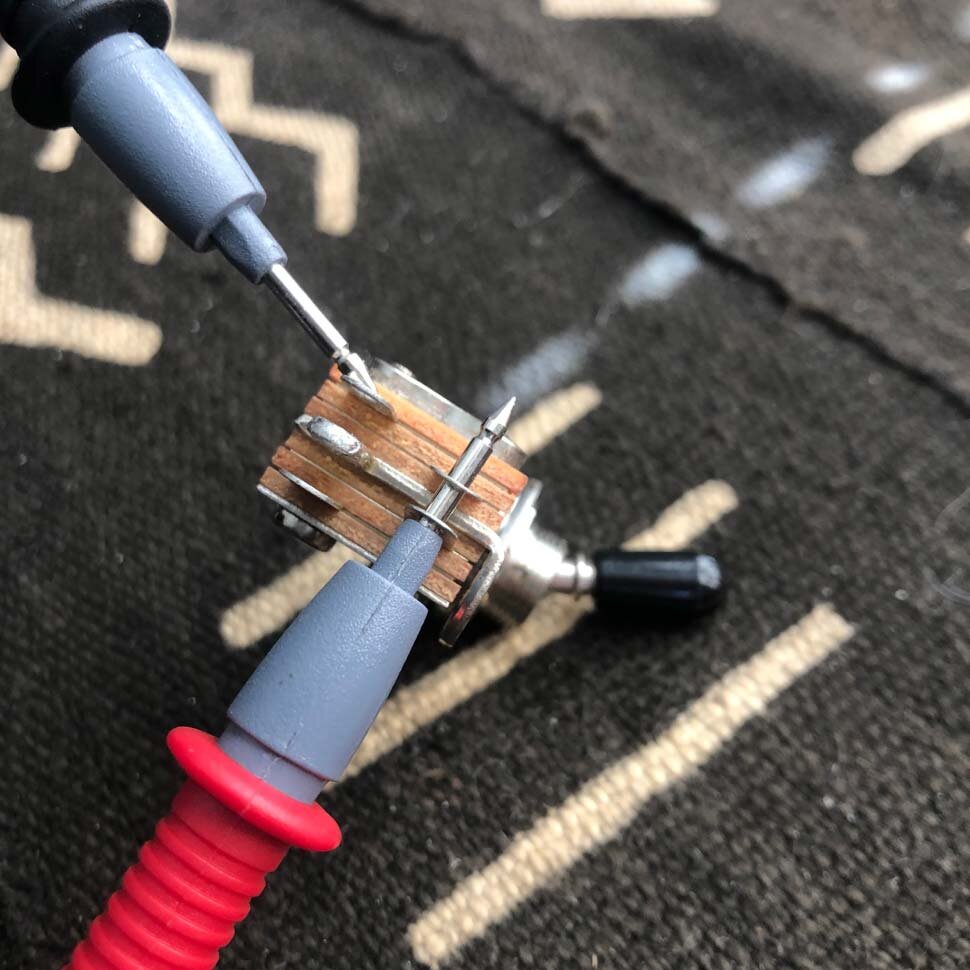

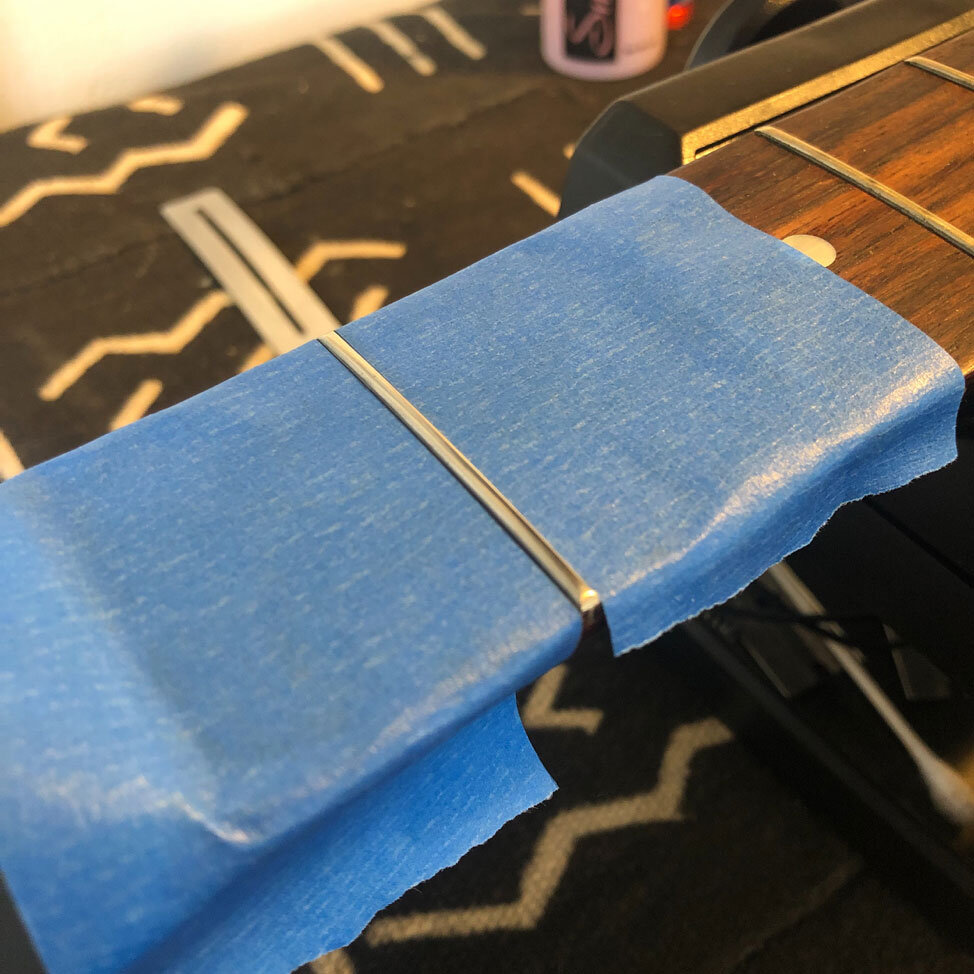
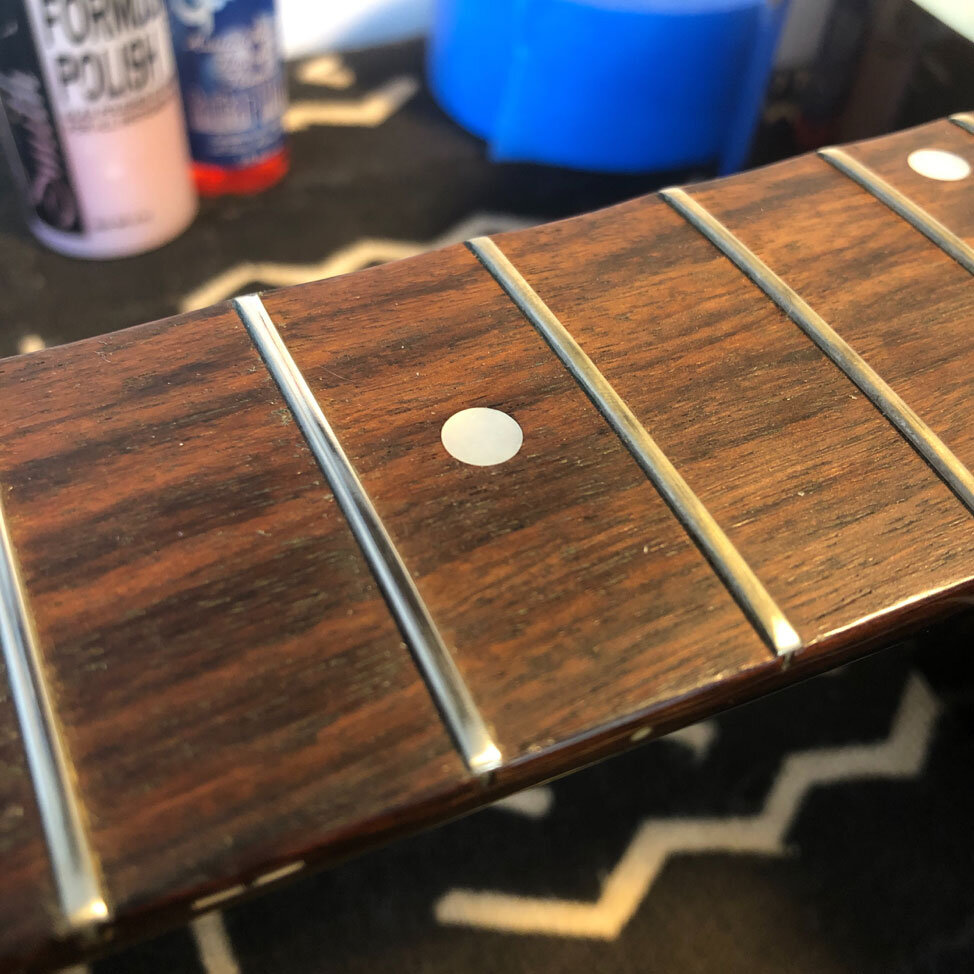


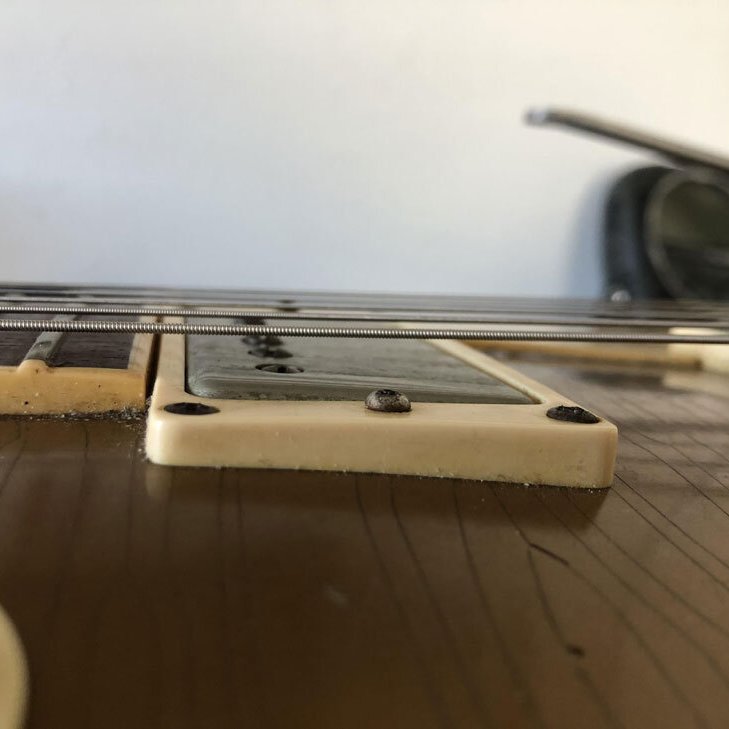
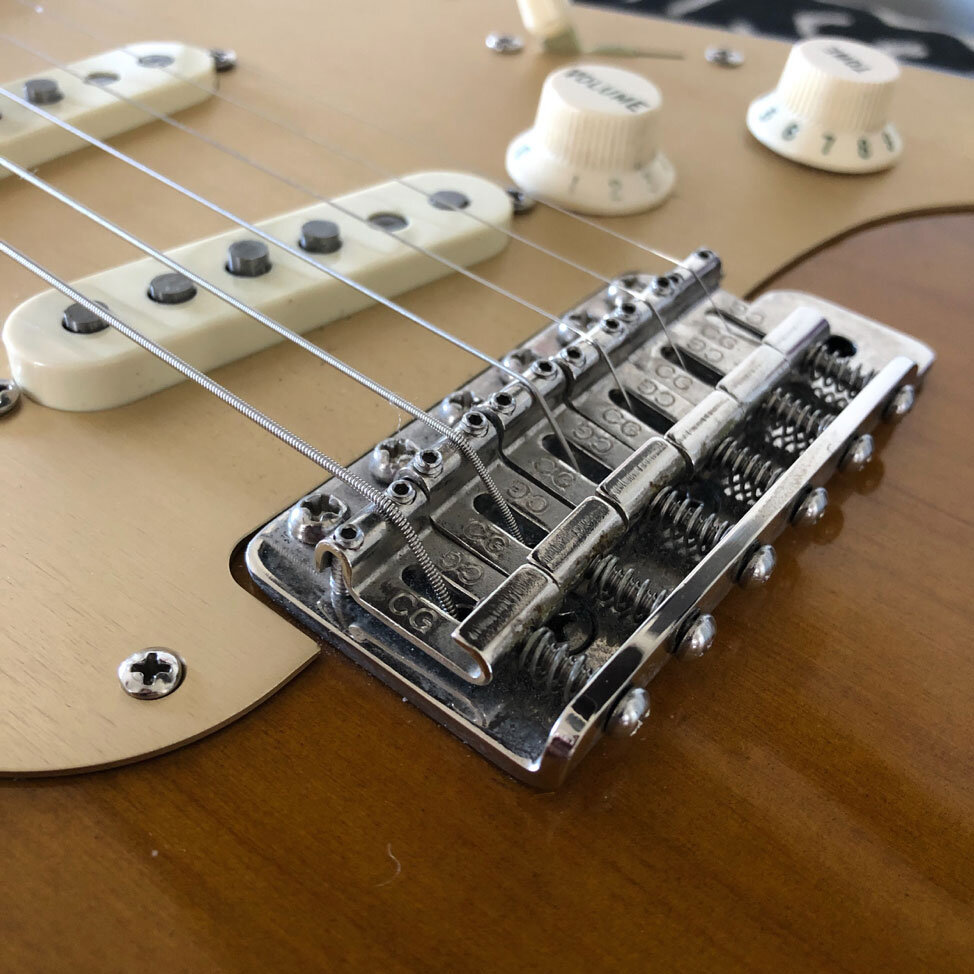
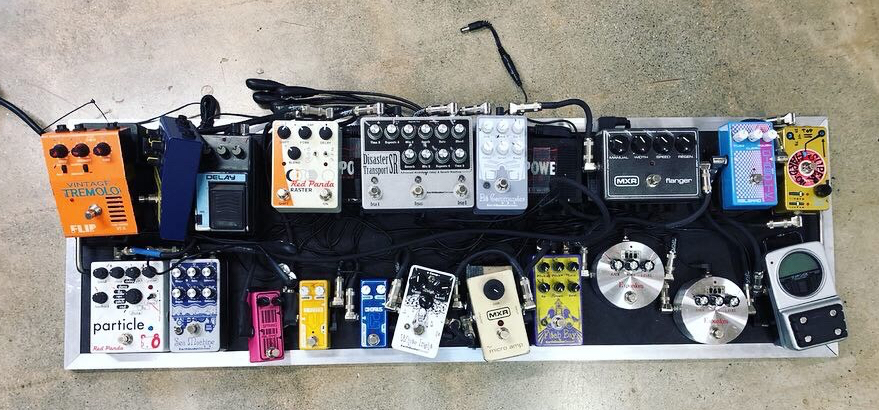
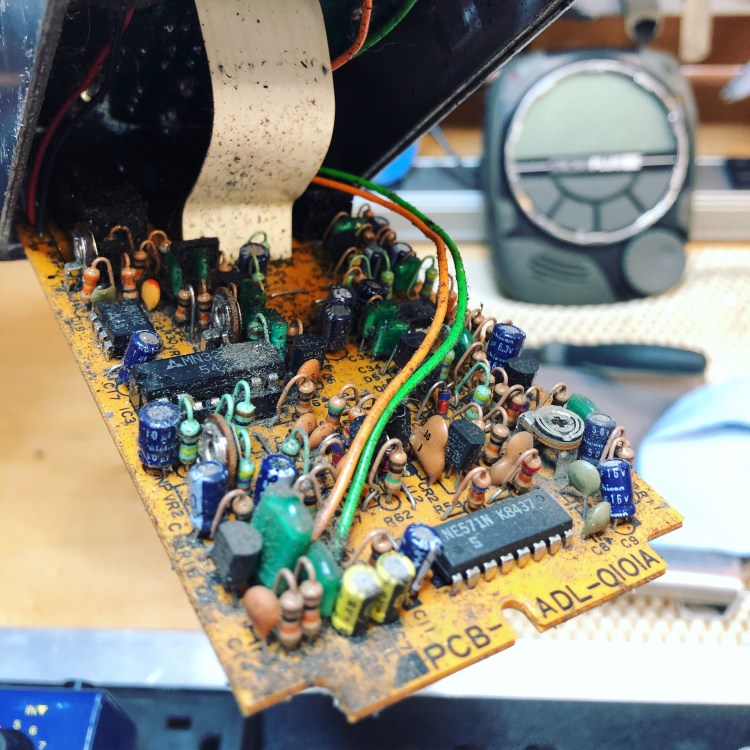
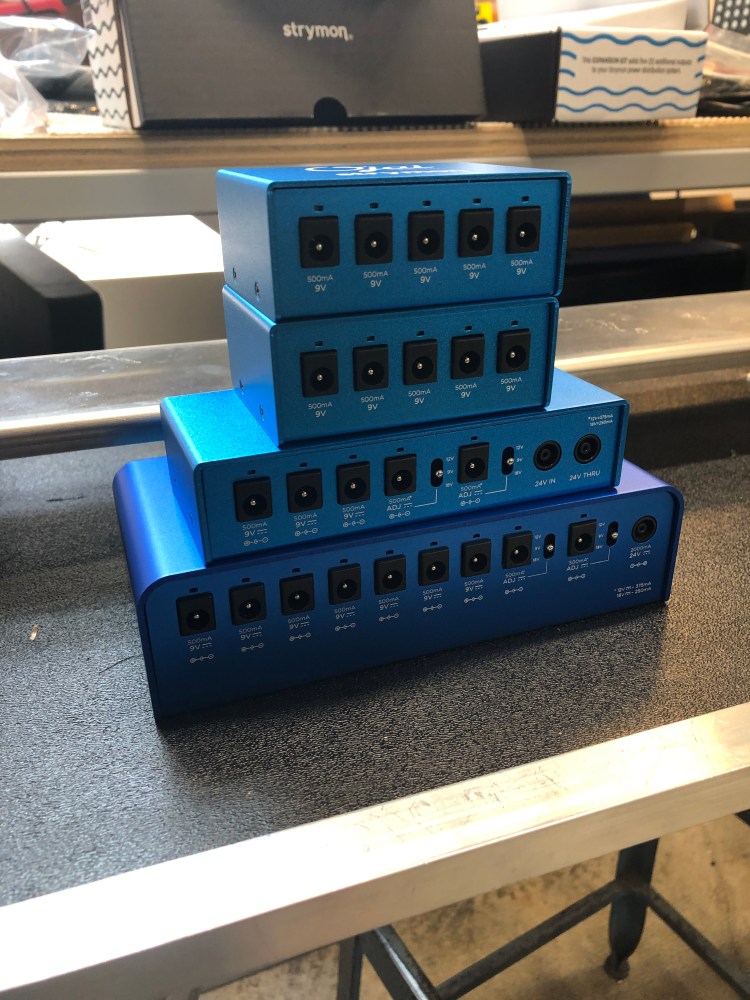
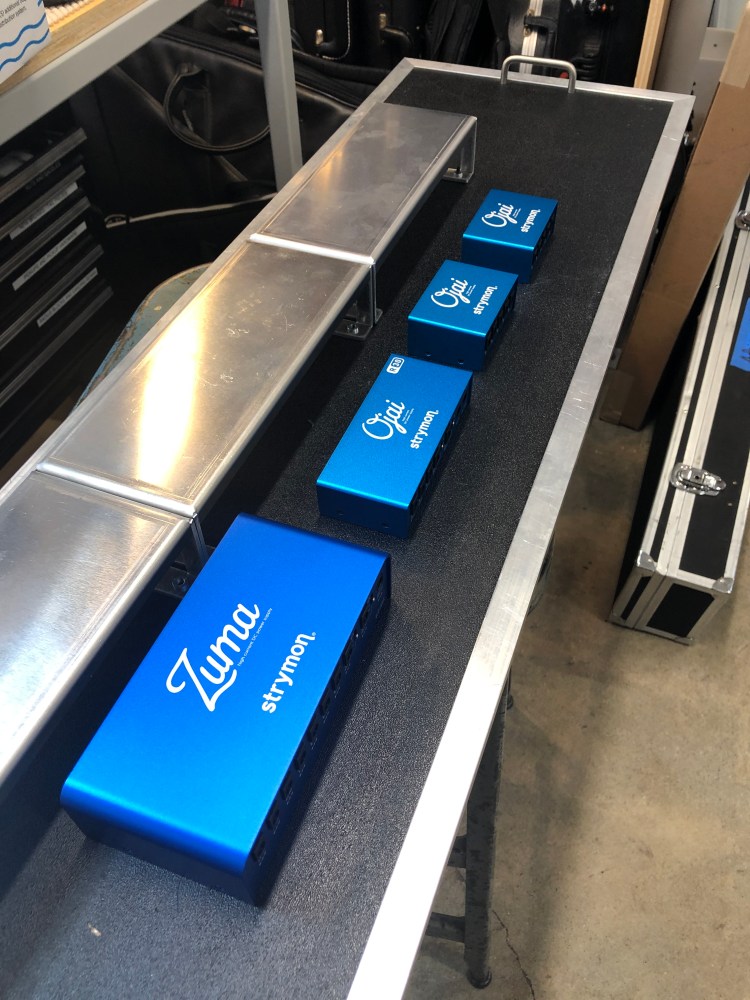
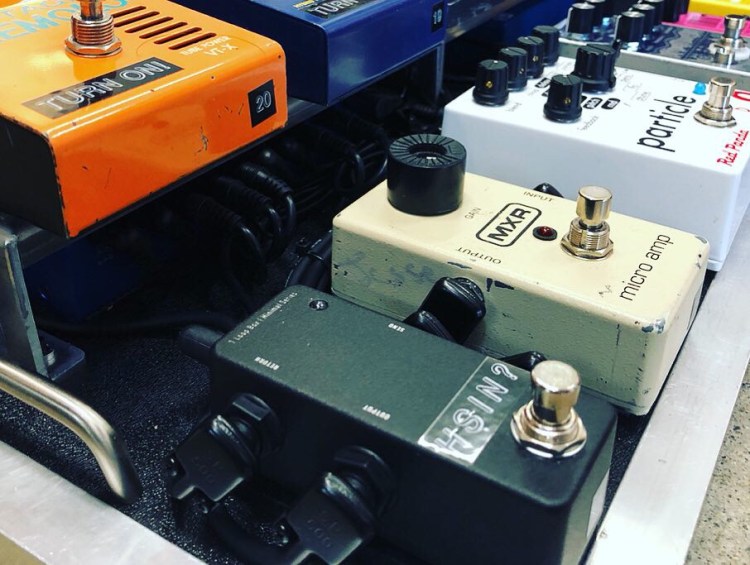
